In the previous article, we have dockerized our Spring Boot Angular application using Docker Compose. In this article, we are gonna deploy our Multi Container Docker application on Ubuntu Server in a VPS such as Digital Ocean Droplet, AWS EC2, Microsoft Azure, Vultr, etc. This blog is hosted on a 5$/pm Digital Ocean Droplet only.
What You’ll Need
An Ubuntu Server with at least 2GB of RAM.
Let’s Get Started
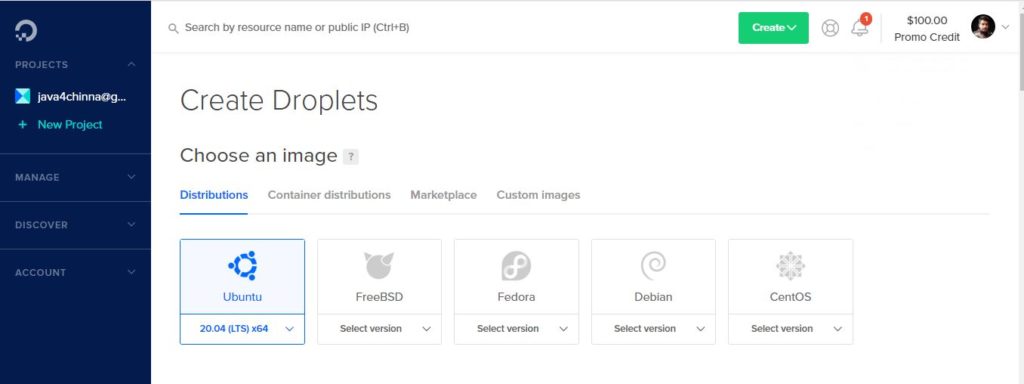
Step 1: Create a Droplet in Digital Ocean
We are gonna create a droplet in Digital Ocean. You can skip this step If you already have an Ubuntu server >=v20.4.
For new users, DigitalOcean is providing 100$ credit valid for 60 days to explore their Services if you use my referral link or their free trial. However, you will be asked to provide the payment details to pay a minimum fee of 5$ which can be used for future billings.
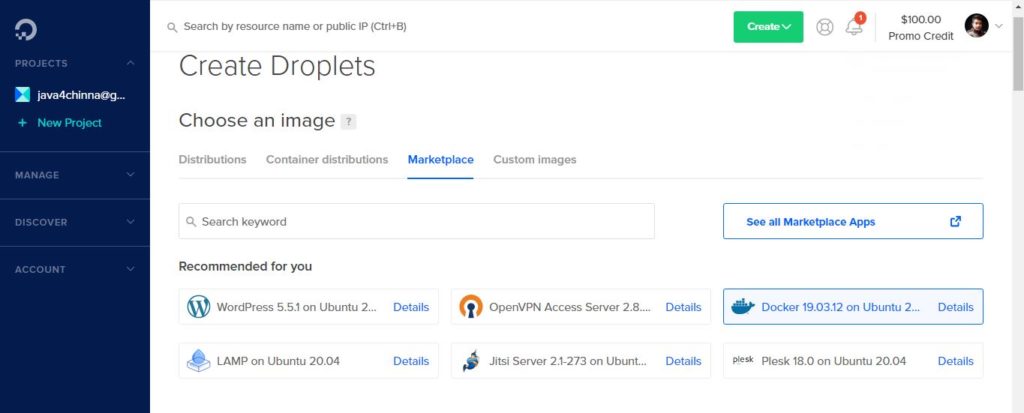
You can also choose an Ubuntu Image with Docker & Docker Compose pre-installed in it as shown below. If you choose this one, then you can skip the Docker & Docker Compose installation steps below.
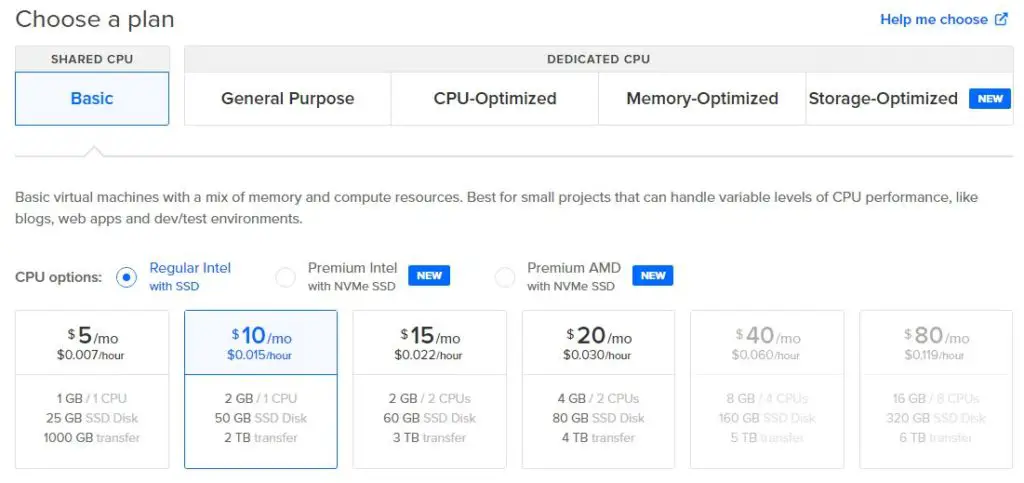
We need at least 2GB of RAM since we are gonna build docker images for client and server applications and run 3 docker containers in a single droplet.
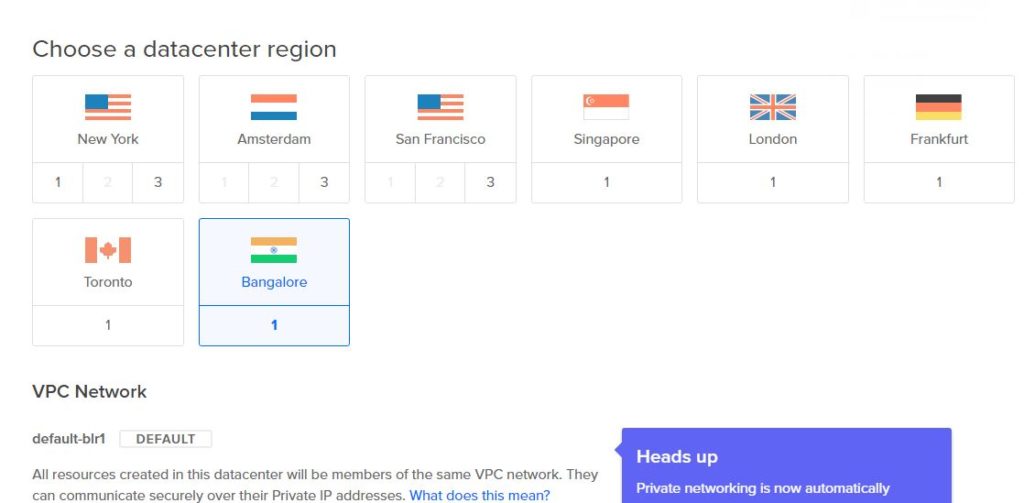
Select a data center that is closer to you or the target audience of your application. I have selected the Bangalore datacenter since I’m from India.
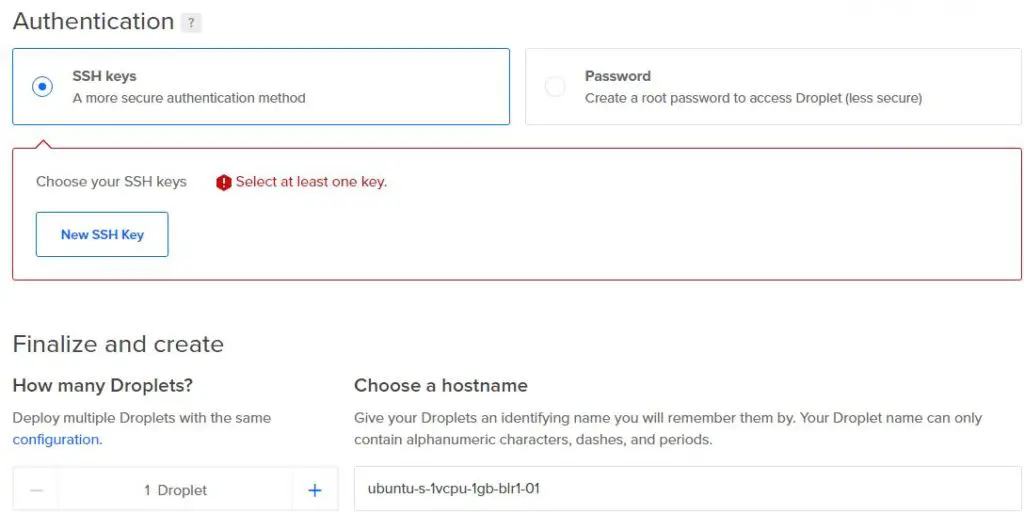
SSH is the recommended authentication method. Select SSH keys and click on the New SSH Key button.
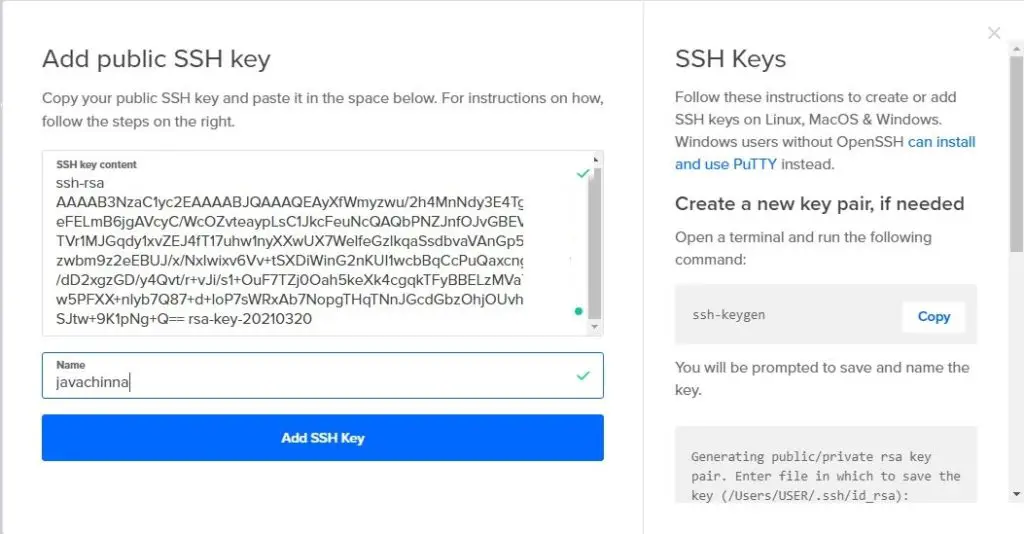
Generate a public SSH key and paste it here. You can refer this article on how to generate the SSH key using Putty.
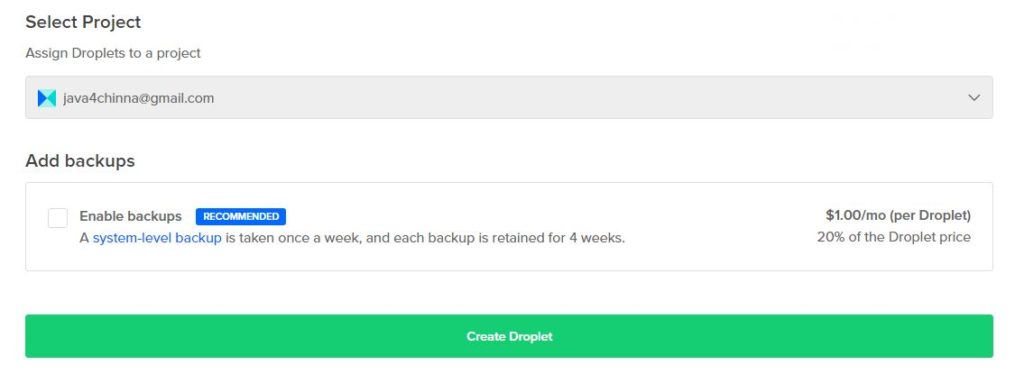
You can create projects for different applications and environments like test, staging, prod etc. For now, we are gonna use the default project and create droplet.
Once the droplet is created, the droplet name and public IP address will be displayed. We can SSH into the server using this public IP in putty.
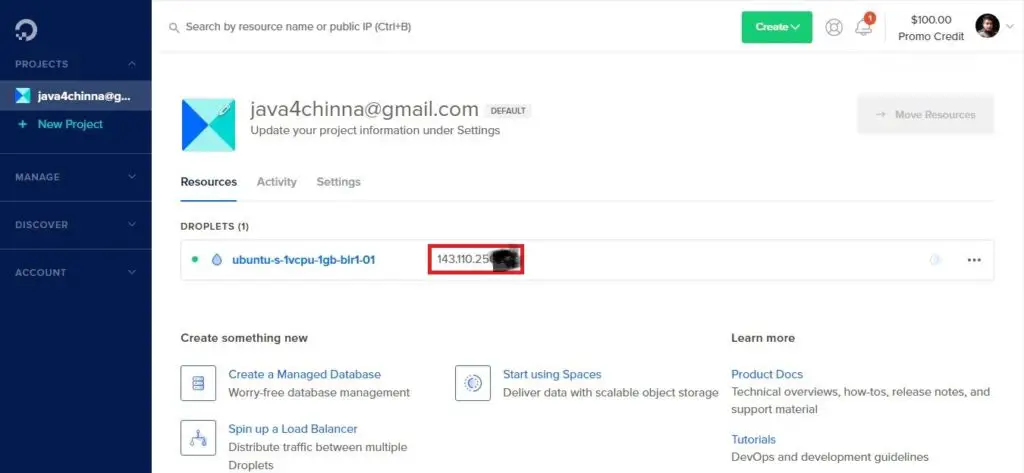
If you click on droplet name, it will take you to the droplet management page.
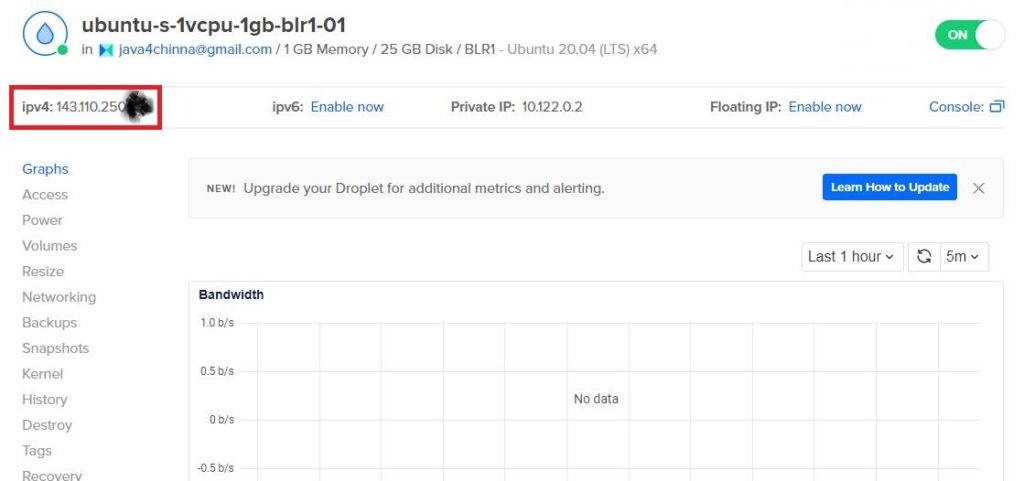
Step 2: Login to the Server
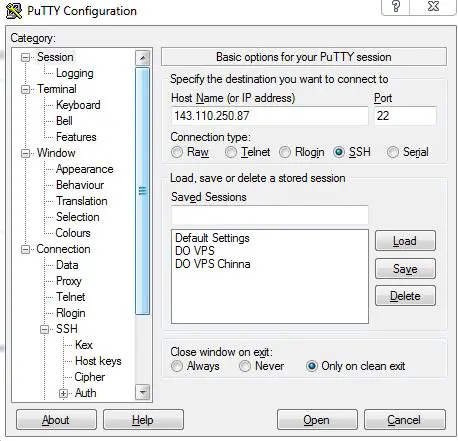
SSH into the server via putty using the public IP address of the server
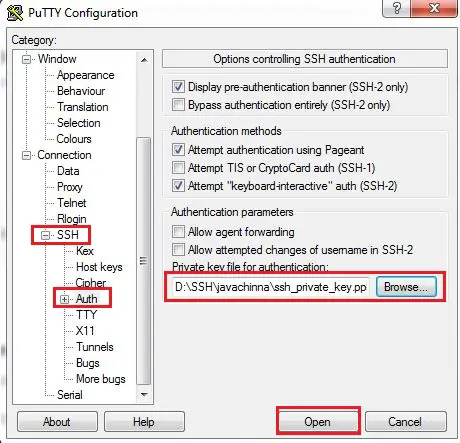
Select SSH Auth tab on the left and Select the ssh public key file that you have generated earlier and click on Open button and login as root user with SSH key passphrase.
Step 3: Set up a Basic Firewall
We need to enable a basic firewall and allow OpenSSH if not done already.
Check the list of apps allowed by the firewall
ufw app list
Allow OpenSSH
ufw allow OpenSSH
Enable firewall
ufw enable
Check the status of the firewall
ufw status
You’ll see output similar to this:

For more information on initial server setup, you can refer this.
Step 4: Create a non-root user with sudo privileges
Add a new user
We are gonna create a user named as javachinna. You need to replace this with your own user name wherever it is used in the following commands.
adduser javachinna
Add the user to the sudo group
usermod -aG sudo javachinna
Restart the ssh service for the changes to reflect
service ssh restart
Step 5: Allow SSH access to the non-root user
The following command will copy the root user’s .ssh directory, preserve the permissions and modify the file owners, all in a single command.
rsync --archive --chown=javachinna:javachinna ~/.ssh /home/javachinna
Step 6: Login to the Server as sudo non-root User
Open a new terminal session and login as javachinna with the same ssh private key to continue the set up further.
Step 7: Install Git
Once logged into your Ubuntu server as a sudo non-root user, first update your default packages.
sudo apt update
Install Git
sudo apt install git
Check if Git installed
git --version
Set your git user name and email
git config --global user.name "JavaChinna"
git config --global user.email "[email protected]"
Step 8: Install Docker
We are gonna download Docker from the official docker repository.
First, update the existing list of packages
sudo apt update
Next, install a few prerequisite packages which let apt use packages over HTTPS
sudo apt install apt-transport-https ca-certificates curl software-properties-common
Then add the GPG key for the official Docker repository to the system
curl -fsSL https://download.docker.com/linux/ubuntu/gpg | sudo apt-key add -
Add the Docker repository to APT sources
sudo add-apt-repository "deb [arch=amd64] https://download.docker.com/linux/ubuntu focal stable"
Next, update the package database with the Docker packages from the newly added repo
sudo apt update
Make sure you are about to install from the Docker repo instead of the default Ubuntu repo
apt-cache policy docker-ce
You’ll see output like this, although the version number for Docker may be different
docker-ce:
  Installed: (none)
  Candidate: 5:20.10.5~3-0~ubuntu-focal
  Version table:
 *** 5:20.10.5~3-0~ubuntu-focal 500
        500 https://download.docker.com/linux/ubuntu focal/stable amd64 Packages
Notice that docker-ce is not installed, but the candidate for installation is from the Docker repository for Ubuntu 20.10 (focal).
Finally, install Docker
sudo apt install docker-ce
Docker should now be installed, the daemon started, and the process enabled to start on boot. Check that it’s running
sudo systemctl status docker
The output should be similar to the following, showing that the service is active and running:
● docker.service - Docker Application Container Engine
     Loaded: loaded (/lib/systemd/system/docker.service; enabled; vendor preset>
     Active: active (running) since Sun 2021-03-21 07:57:06 UTC; 8h ago
TriggeredBy: ● docker.socket
       Docs: https://docs.docker.com
   Main PID: 21072 (dockerd)
      Tasks: 29
     Memory: 294.2M
Installing Docker now gives you not just the Docker service (daemon) but also the docker command line utility, or the Docker client. Refer here for more details and steps for executing the Docker Command Without Sudo.
Step 9: install Docker Compose
To make sure we obtain the most updated stable version of Docker Compose, we’ll download this software from its official Github repository.
First, confirm the latest version available in their releases page. At the time of this writing, the most current stable version is 1.28.5.
The following command will download the 1.28.5 release and save the executable file at /usr/local/bin/docker-compose, which will make this software globally accessible as docker-compose:
sudo curl -L "https://github.com/docker/compose/releases/download/1.28.5/docker-compose-$(uname -s)-$(uname -m)" -o /usr/local/bin/docker-compose
Next, set the correct permissions so that the docker-compose command is executable:
sudo chmod +x /usr/local/bin/docker-compose
To verify that the installation was successful, you can run:
docker-compose --version
You’ll see output similar to this:
docker-compose version 1.28.5, build c4eb3a1f
You can refer this for more information on Docker Compose Installation.
Step 10: Clone Source Code
Lets create a sourcecode directory and clone the source code into that directory
sudo mkdir /var/sourcecode
cd /var/sourcecode/
sudo git clone https://github.com/JavaChinna/spring-boot-angular-2fa-demo.git
cd spring-boot-angular-2fa-demo/
Note: This sample application is configured to run on localhsot. The app-server container can connect to mysql container on localhost since we have specified the networks in the docker-compose file. But, the angular client will be running on the browser. Hence, except spring.datasource.url, we need to replace all the occurrences of localhost to our actual IP in the following configuration files.
spring-boot-angular-2fa-demo\spring-boot-oauth2-social-login\src\main\resources\application.properties
spring-boot-angular-2fa-demo\angular-11-social-login\src\app\common\app.constants.ts
Step 11: Run the Application
Use docker-compose command to build the images and run all the containers. Once it is up, you can hit this URL http://<ip-address>:8081/
sudo docker-compose up -d
You’ll see output similar to this:
javachinna@ubuntu-s-1vcpu-2gb-blr1-01:/var/sourcecode/spring-boot-angular-2fa-demo$ sudo docker-compose up
Starting spring-boot-angular-2fa-demo_db_1 ... done
Starting spring-boot-angular-2fa-demo_app-server_1 ... done
Starting spring-boot-angular-2fa-demo_app-client_1 ... done
Conclusion
That’s all folks. In this article, we have deployed our Spring Boot Angular application on Ubuntu Server.
Thank you for reading.
Disclosure: Please note that some of the links above are affiliate links and at no additional cost to you, I’ll earn a commission. Know that I only recommend products and services I’ve personally used and stand behind.


