In the previous article, we have configured Angular environment variables to define the frontend and backend URLs for staging and production environments. In this article, we are gonna deploy our Multi Container Docker application on Digital Ocean Kubernetes.
Disclosure: Please note that some of the links below are referral/affiliate links and at no additional cost to you, I’ll earn a credit/commission. Know that I only recommend products and services I’ve personally used and stand behind.
Introduction
Kubernetes is an open source container orchestration engine for automating deployment, scaling, and management of containerized applications.
Terminology
Let’s have a quick intro to the Kubernetes terminologies from the official documentation.
- Pod: A Pod (as in a pod of whales or pea pod) is a group of one or more containers, with shared storage and network resources, and a specification for how to run the containers.
- Node: A worker machine in Kubernetes, part of a cluster. Kubernetes runs your workload by placing containers into Pods to run on Nodes. A node may be a virtual or physical machine, depending on the cluster. Each node is managed by the control plane and contains the services necessary to run Pods
- Cluster: A set of Nodes that run containerized applications managed by Kubernetes. For this example, and in most common Kubernetes deployments, nodes in the cluster are not part of the public internet.
- Cluster network: A set of links, logical or physical, that facilitate communication within a cluster according to the Kubernetes networking model.
- Service: A Kubernetes Service that identifies a set of Pods using label selectors. Unless mentioned otherwise, Services are assumed to have virtual IPs only routable within the cluster network.
What You’ll Need
- Docker Desktop for Mac and Windows OS. For older versions of Windows, you might need to install the docker toolbox. You can refer here for installation instructions.
- DockerHub account
- Fully registered domain name with 2 A records.
- Spring Boot + Angular + MySQL Maven Application
What You’ll Build
From domain registration to deploying Angular + Spring Boot + MySQL Application on DigitalOcean Managed Kubernetes to hosting on https://client.javachinna.xyz/
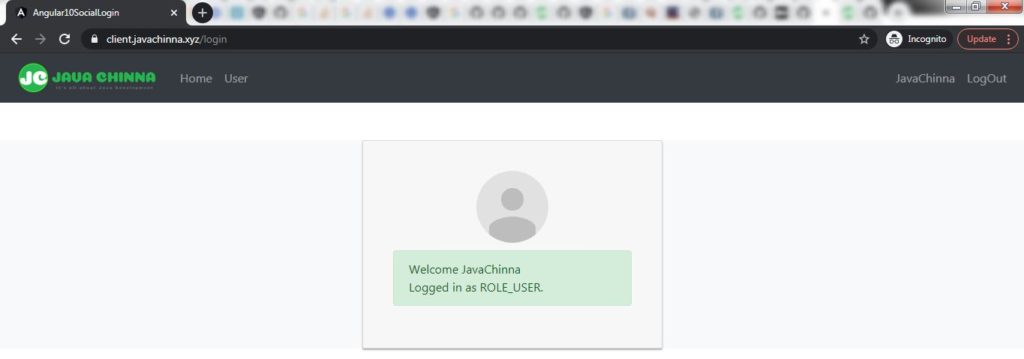
Register Domain
For this tutorial, I have registered javachinn.xyz via NameCheap and updated the NameServers to point to DigitalOcean NameServers ns1.digitalocean.com & ns2.digitalocean.com. So that we can maintain the DNS records for this domain in DigitalOcean.
If you have registered your domain from NameCheap, then you can login to your namecheap portal and select Domain List and click on “Manage” button to go to the Domain Management Page
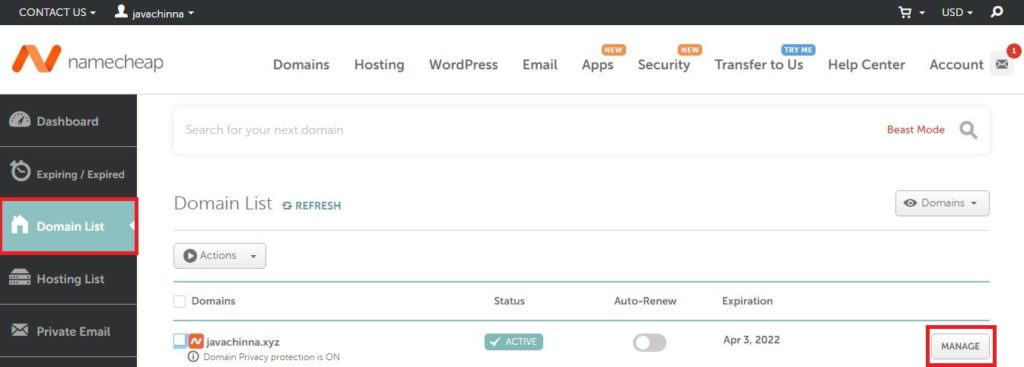
Update NameServers
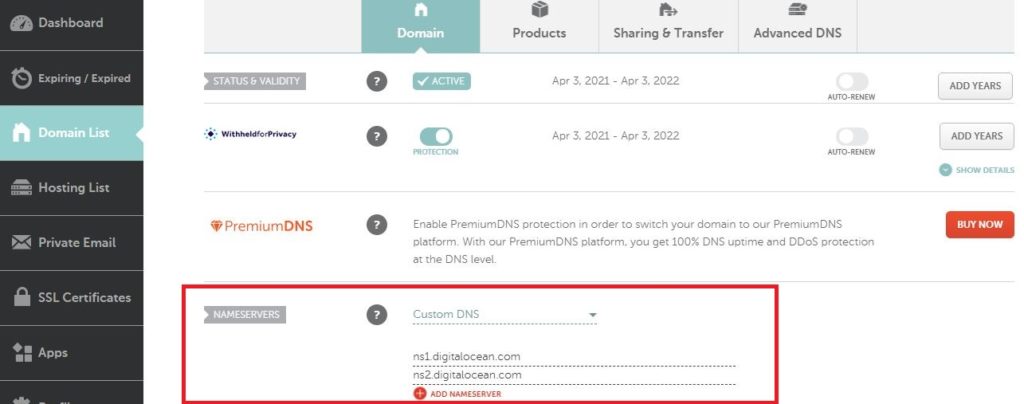
For other domain registrars, the process should be pretty much similar.
Create and Push Docker Images to DockerHub
Let’s clone Spring Boot + Angular + MySQL Maven Application. The angular and Spring Boot images are already available in DockerHub. So if you want to use the same images for learning purposes, then you can skip this section.
Configure Social Login (Optional)
We have already configured angular client / API URLs to https://client.javachinna.xyz/ and http://client.javachinna.xyz/ respectively in the previous article. However, If you want to test the Social Login functionality, then the following changes need to be done:
- Provide your Social Login provider credentials in the Spring Boot
application.properties - Add https://subdomain.example.com/ to
app.oauth2.authorizedRedirectUrisproperty inapplication.propertiesto whitelist the client URL - Add https://subdomain.example.com/ to your Social Login provider Authorized redirect URIs field in the developer console to whitelist the client URL
Once done, you can build the Spring Boot Image and Push.
Authenticate Docker to Connect to DockerHub
Use the following command to login to DockerHub with your credentials to push the images to DockerHub.
docker login
Create Angular Application Image
Run the following command to create an angular app image from the spring-boot-angular-2fa-demo\angular-11-social-login directory
docker build -t javachinna/social-login-app-client:1.0.0 .
Push the image to DockerHub
docker push javachinna/social-login-app-client:1.0.0
Create Spring Boot Application Image
Run the following command to create a Spring Boot app image from the spring-boot-angular-2fa-demo\spring-boot-oauth2-social-login directory
docker build -t javachinna/social-login-app-server:1.0.0 .
Push the image to DockerHub
docker push javachinna/social-login-app-server:1.0.0
Create Kubernetes Cluster
We are gonna create a Kubernetes Cluster on Digital Ocean. You can skip this step If you already have Kubernetes ready for deployment.
For new users, DigitalOcean is providing 100$ credit valid for 60 days to explore their Services if you use my referral link. However, you will be asked to provide the payment details to pay a minimum fee of 5$ which can be used for future billings.
Once logged in, Click on Create button on the top right corner and select Kubernetes Or Click on Kubernetes Menu on Left and Create a Kubernetes Cluster
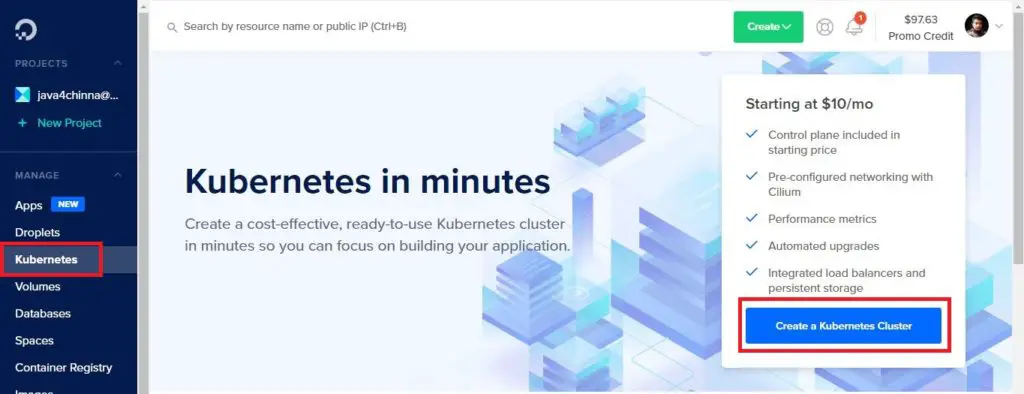
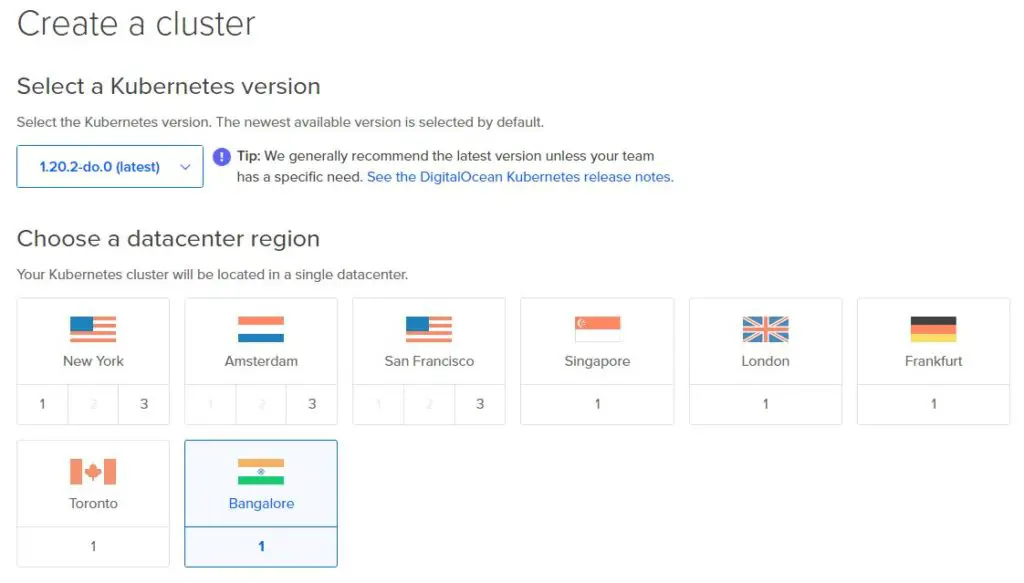
Select a Kubernetes Version and Datacenter Region. You can select a data center that is closer to you or the target audience of your application. I have selected the Bangalore datacenter since I’m from India.
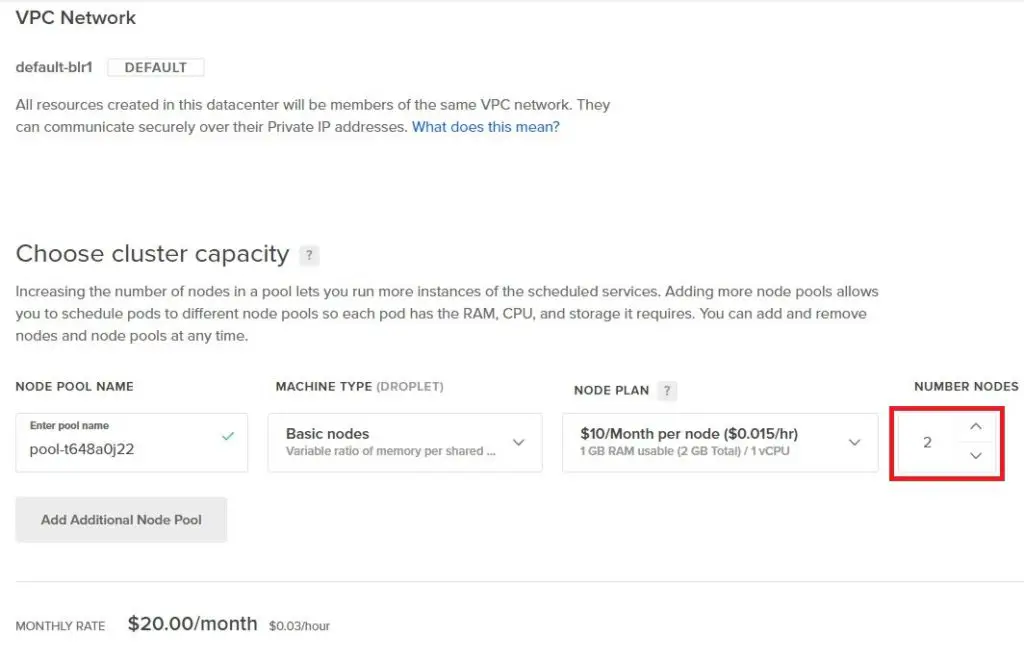
Select Number of Nodes: A minimum of 2 nodes is required to prevent downtime during upgrades or maintenance
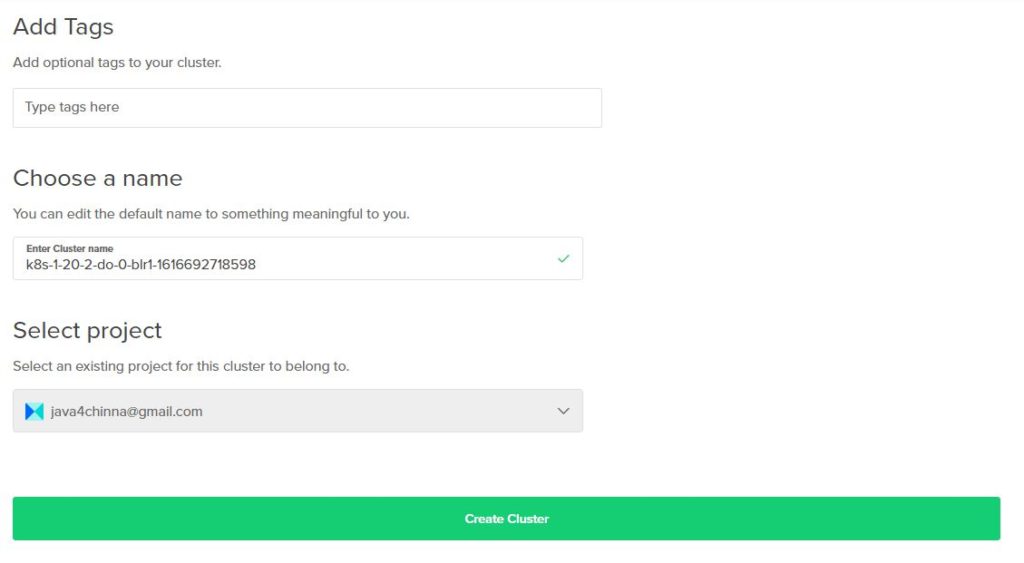
Enter Cluster Name and Create Cluster
Kubernetes cluster provisioning is usually complete within 4 minutes.. Once it is created, it will show up like this
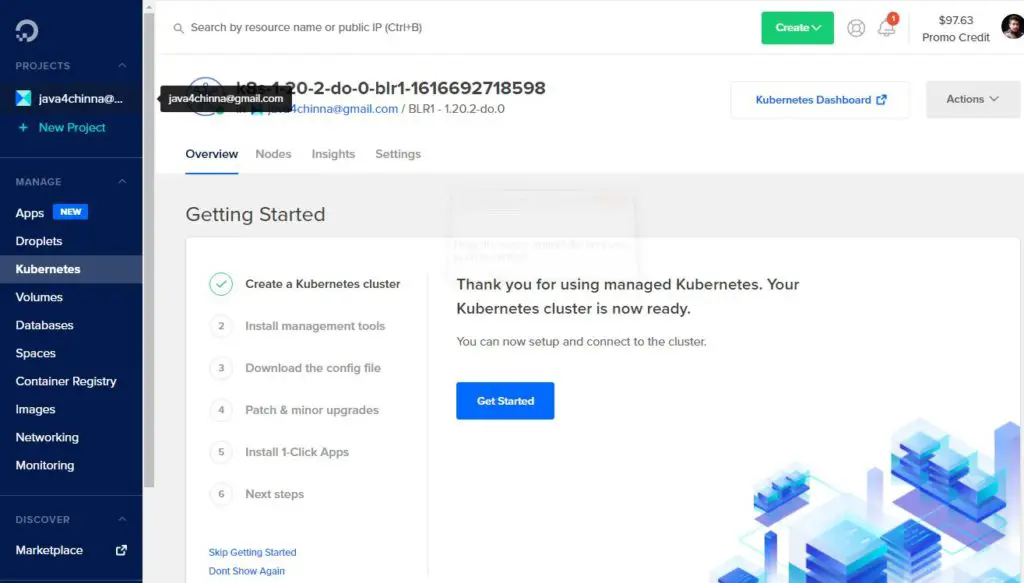
You can also click on the Kubernetes Dashboard link available on the top right corner to go to the Kubernetes dashboard.
Install Kubectl
The Kubernetes command-line tool, kubectl, allows you to run commands against Kubernetes clusters. You can use kubectl to deploy applications, inspect and manage cluster resources, and view logs.
For windows,
- Download the latest release v1.21.0
- Place the
kubectl.exefile in a directory likeD:\Apps\kube - Add the
kubedirectory to the PATH environment variable:System Settings -> Environment Variables -> System variables -> Path
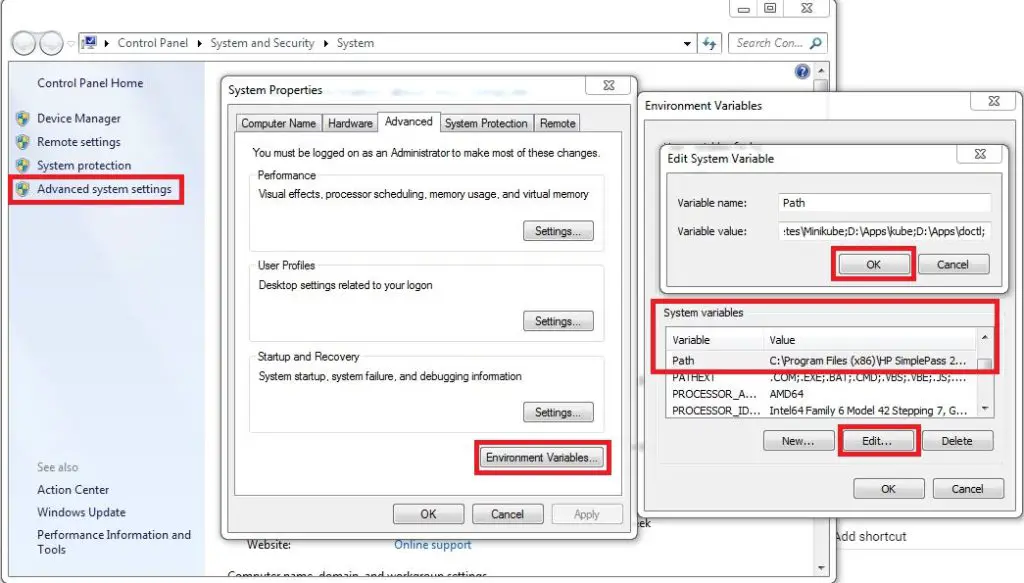
- Check if
kubectlis installed in command prompt
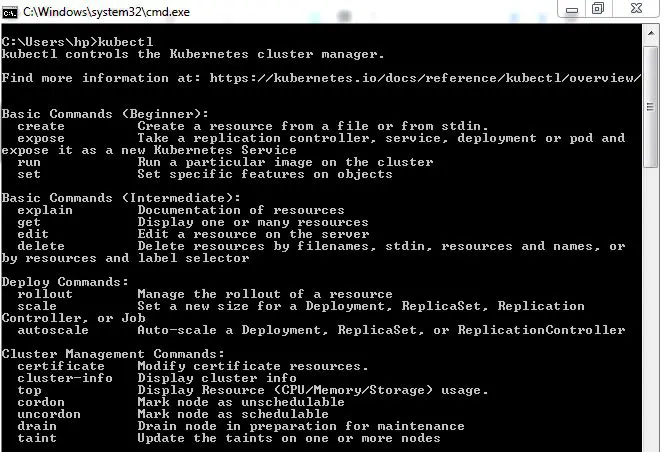
For Other OS, refer the official documentation
Install doctl
doctl is a command-line interface (CLI) for the DigitalOcean API. We need this tool to connect to the remote Kubernetes Cluster from our local development machine.
For Windows,
- Download the latest release
- Place the
doctl.exefile in a directory likeD:\Apps\doctl - Add the
doctldirectory to the PATH environment variable as shown above - Check if
doctlis installed in the command prompt
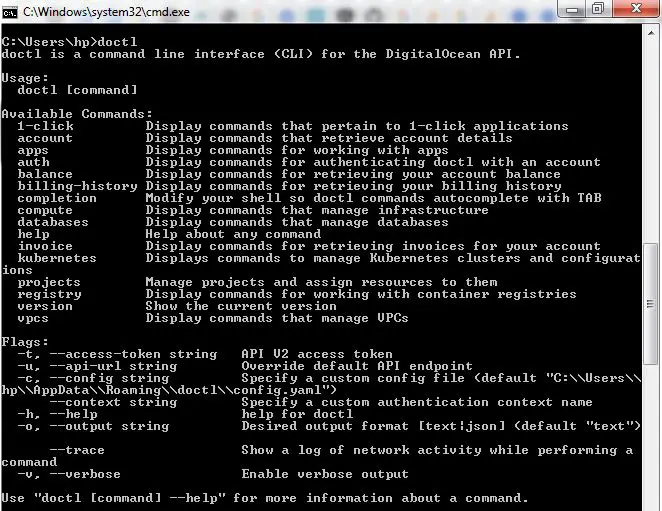
For Other OS, the doctl GitHub repo has instructions for installing doctl
Connect to Remote Kubernetes Cluster
Create DigitalOcean API Access Token
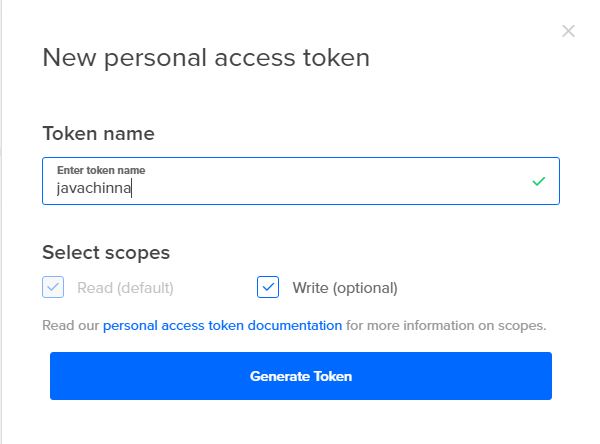
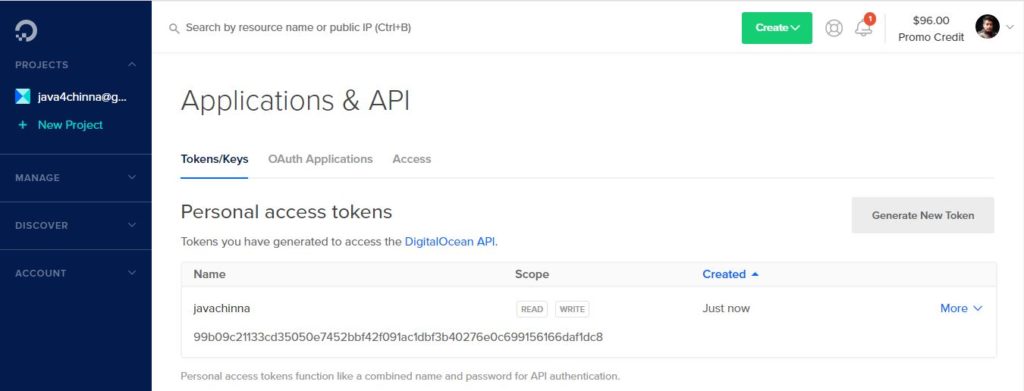
To use doctl, we need to authenticate with DigitalOcean by providing an access token, which can be created from the Applications & API section of the Control Panel.
Select API Menu on the left and Generate New Token
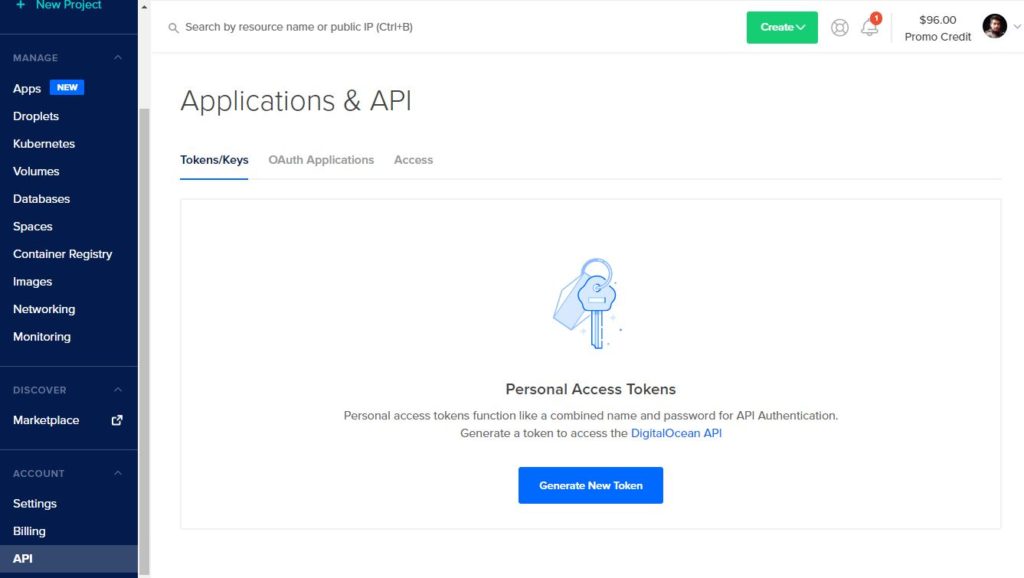
Authenticate with DigitalOcean
Authenticate with the auth init command.
doctl auth init
You will be prompted to enter the DigitalOcean access token that you generated in the DigitalOcean control panel.
DigitalOcean access token: your_DO_token
After entering your token, you will receive confirmation that the credentials were accepted. If the token doesn’t validate, make sure you copied and pasted it correctly.
Validating token: OK
This will create the necessary directory structure and configuration file to store your credentials.
Get an Authentication Token or Certificate
We need to add an authentication token or certificate to our kubectl configuration file to connect to the remote cluster.
To configure authentication from the command line, use the following command, substituting the name of your cluster.
doctl kubernetes cluster kubeconfig save use_your_cluster_name
Output
C:\Users\hp>doctl kubernetes cluster kubeconfig save k8s-1-20-2-do-0-blr1-161802
4785666
Notice: Adding cluster credentials to kubeconfig file found in "C:\\Users\\hp/.k
ube/config"
Notice: Setting current-context to do-blr1-k8s-1-20-2-do-0-blr1-1618024785666
This downloads the kubeconfig for the cluster, merges it with any existing configuration from ~/.kube/config, and automatically handles the authentication token or certificate.
If you don’t want to use the doctl tool, then you can download the cluster configuration file manually from the control panel and put this file in your ~/.kube directory, and pass it to kubectl with the --kubeconfig flag. Refer to the official guide for more information.
Once the cluster configuration file is in place, you can create, manage, and deploy clusters using kubectl. See the official kubectl documentation to learn more about its commands and options.
Contexts
In Kubernetes, a context is used to group access parameters under a convenient name.
When you use kubectl, the commands you run affect the default context unless you specify a different one with the --context flag (for example, kubectl get nodes --context=do-nyc1-stage).
To check the current default context, use:
kubectl config current-context
Output
C:\Users\hp>kubectl config current-context
do-blr1-k8s-1-20-2-do-0-blr1-1618024785666
If you get a current-context is not set error, you need to set a default context.
To get all contexts:
kubectl config get-contexts
Output
CURRENT   NAME                                         CLUSTER
                    AUTHINFO                                           NAMESPACE

          do-blr1-k8s-1-20-2-do-0-blr1-1616692718598   do-blr1-k8s-1-20-2-do-0-b
lr1-1616692718598   do-blr1-k8s-1-20-2-do-0-blr1-1616692718598-admin
*         do-blr1-k8s-1-20-2-do-0-blr1-1618024785666   do-blr1-k8s-1-20-2-do-0-b
lr1-1618024785666   do-blr1-k8s-1-20-2-do-0-blr1-1618024785666-admin
The default context is specified with an asterisk under “CURRENT”. To set the default context to a different one, use:
kubectl config use-context your-context-name
Create Kubernetes Secrets
Kubernetes Secrets let you store and manage sensitive information, such as passwords, OAuth tokens, and ssh keys. Storing confidential information in a Secret is safer and more flexible than putting it in a Pod definition or in a container image.
You can generate the secrets either manually or with a Secret Generator using Kustomize.
We are gonna generate secrets for MySQL credentials, database name, and URL manually. You can replace these values with yours.
Generate Secret for MySQL Root Password
kubectl create secret generic mysql-root-pass --from-literal=password=R00t
Generate Secret for MySQL User name and Password
kubectl create secret generic mysql-user-pass --from-literal=username=javachinna --from-literal=password=j@v@ch1nn@
Generate Secret for MySQL Database name and URL.
kubectl create secret generic mysql-db-url --from-literal=database=demo --from-literal=url="jdbc:mysql://social-login-app-mysql:3306/demo?useSSL=false&serverTimezone=UTC&useLegacyDatetimeCode=false&allowPublicKeyRetrieval=true"
Note: social-login-app-mysql is the service name of MySQL database that we are gonna deploy in the next section.
To get the list of secrets that we have created
kubectl get secrets
Output
NAME                  TYPE                                  DATA   AGE
default-token-cx27s   kubernetes.io/service-account-token   3      3h29m
mysql-db-url          Opaque                                2      18s
mysql-root-pass       Opaque                                1      29s
mysql-user-pass       Opaque                                2      24s
To describe a specific secret
kubectl describe secret secret_name
Output
C:\Users\hp>kubectl describe secret mysql-db-url
Name:         mysql-db-url
Namespace:    default
Labels:       <none>
Annotations:  <none>

Type:  Opaque

Data
====
database:  4 bytes
url:       134 bytes
Deploy MySQL on Kubernetes using PersistentVolume and Secrets
A PersistentVolume (PV) is a piece of storage in the cluster that has been manually provisioned by an administrator, or dynamically provisioned by Kubernetes using a StorageClass. It is a resource in the cluster just like a node is a cluster resource.
A PersistentVolumeClaim (PVC) is a request for storage by a user that can be fulfilled by a PV. It is similar to a Pod. Pods consume node resources and PVCs consume PV resources. Pods can request specific levels of resources (CPU and Memory). Claims can request specific size and access modes (e.g., they can be mounted ReadWriteOnce, ReadOnlyMany or ReadWriteMany, see AccessModes). PersistentVolumes and PersistentVolumeClaims are independent from Pod lifecycles and preserve data through restarting, rescheduling, and even deleting Pods.
Many applications require multiple resources to be created, such as a Deployment and a Service. Management of multiple resources can be simplified by grouping them together in the same file (separated by --- in YAML).
Let’s navigate to the spring-boot-angular-2fa-demo source code directory and create a k8s directory to place all the YAML manifest files in one place.
We’re gonna create four resources with the following manifest file for MySQL deployment. A PersistentVolume, a PersistentVolumeClaim for requesting access to the PersistentVolume resource, a service for having a static endpoint for the MySQL database, and a deployment for running and managing the MySQL pod.
The MySQL container reads database credentials and URL from environment variables. The environment variables access these credentials from Kubernetes secrets.
k8s/mysql.yml
apiVersion: v1
kind: PersistentVolume            # Create a PersistentVolume
metadata:
  name: mysql-pv
  labels:
    type: local
spec:
  storageClassName: standard      # Storage class. A PV Claim requesting the same storageClass can be bound to this volume.
  capacity:
    storage: 250Mi
  accessModes:
    - ReadWriteOnce
  hostPath:                       # hostPath PersistentVolume is used for development and testing. It uses a file/directory on the Node to emulate network-attached storage
    path: "/mnt/data"
  persistentVolumeReclaimPolicy: Retain  # Retain the PersistentVolume even after PersistentVolumeClaim is deleted. The volume is considered “released”. But it is not yet available for another claim because the previous claimant’s data remains on the volume.
---
apiVersion: v1
kind: PersistentVolumeClaim        # Create a PersistentVolumeClaim to request a PersistentVolume storage
metadata:                          # Claim name and labels
  name: mysql-pv-claim
  labels:
    app: social-login-app
spec:                              # Access mode and resource limits
  storageClassName: standard       # Request a certain storage class
  accessModes:
    - ReadWriteOnce                # ReadWriteOnce means the volume can be mounted as read-write by a single Node
  resources:
    requests:
      storage: 250Mi
---
apiVersion: v1                    # API version
kind: Service                     # Type of kubernetes resource
metadata:
  name: social-login-app-mysql         # Name of the resource
  labels:                         # Labels that will be applied to the resource
    app: social-login-app
spec:
  ports:
    - port: 3306
  selector:                       # Selects any Pod with labels `app=social-login-app,tier=mysql`
    app: social-login-app
    tier: mysql
  clusterIP: None
---
apiVersion: apps/v1
kind: Deployment                    # Type of the kubernetes resource
metadata:
  name: social-login-app-mysql           # Name of the deployment
  labels:                           # Labels applied to this deployment
    app: social-login-app
spec:
  selector:
    matchLabels:                    # This deployment applies to the Pods matching the specified labels
      app: social-login-app
      tier: mysql
  strategy:
    type: Recreate
  template:                         # Template for the Pods in this deployment
    metadata:
      labels:                       # Labels to be applied to the Pods in this deployment
        app: social-login-app
        tier: mysql
    spec:                           # The spec for the containers that will be run inside the Pods in this deployment
      containers:
      - image: mysql:8.0            # The container image
        name: mysql
        env:                        # Environment variables passed to the container
        - name: MYSQL_ROOT_PASSWORD
          valueFrom:                # Read environment variables from kubernetes secrets
            secretKeyRef:
              name: mysql-root-pass
              key: password
        - name: MYSQL_DATABASE
          valueFrom:
            secretKeyRef:
              name: mysql-db-url
              key: database
        - name: MYSQL_USER
          valueFrom:
            secretKeyRef:
              name: mysql-user-pass
              key: username
        - name: MYSQL_PASSWORD
          valueFrom:
            secretKeyRef:
              name: mysql-user-pass
              key: password
        ports:
        - containerPort: 3306        # The port that the container exposes
          name: mysql
        volumeMounts:
        - name: mysql-persistent-storage  # This name should match the name specified in `volumes.name`
          mountPath: /var/lib/mysql
      volumes:                       # A PersistentVolume is mounted as a volume to the Pod
      - name: mysql-persistent-storage
        persistentVolumeClaim:
          claimName: mysql-pv-claim
Deploy MySQL by applying the YAML configuration
kubectl apply -f k8s/mysql.yml
Output
persistentvolume/mysql-pv created
persistentvolumeclaim/mysql-pv-claim created
service/social-login-app-mysql created
deployment.apps/social-login-app-mysql created
Deploy Spring Boot on Kubernetes
The following manifest will create a deployment resource and a service resource for Spring Boot Application.
k8s/app-server.yml
---
apiVersion: apps/v1           # API version
kind: Deployment              # Type of kubernetes resource
metadata:
  name: social-login-app-server    # Name of the kubernetes resource
  labels:                     # Labels that will be applied to this resource
    app: social-login-app-server
spec:
  replicas: 1                 # No. of replicas/pods to run in this deployment
  selector:
    matchLabels:              # The deployment applies to any pods mayching the specified labels
      app: social-login-app-server
  template:                   # Template for creating the pods in this deployment
    metadata:
      labels:                 # Labels that will be applied to each Pod in this deployment
        app: social-login-app-server
    spec:                     # Spec for the containers that will be run in the Pods
      containers:
      - name: social-login-app-server
        image: javachinna/social-login-app-server:1.0.0
        imagePullPolicy: Always
        ports:
          - name: http
            containerPort: 8080 # The port that the container exposes
        resources:
          limits:
            cpu: 0.2
            memory: "200Mi"
        env:                  # Environment variables supplied to the Pod
        - name: SPRING_DATASOURCE_USERNAME # Name of the environment variable
          valueFrom:          # Get the value of environment variable from kubernetes secrets
            secretKeyRef:
              name: mysql-user-pass
              key: username
        - name: SPRING_DATASOURCE_PASSWORD
          valueFrom:
            secretKeyRef:
              name: mysql-user-pass
              key: password
        - name: SPRING_DATASOURCE_URL
          valueFrom:
            secretKeyRef:
              name: mysql-db-url
              key: url
---
apiVersion: v1                # API version
kind: Service                 # Type of the kubernetes resource
metadata:
  name: social-login-app-server    # Name of the kubernetes resource
  labels:                     # Labels that will be applied to this resource
    app: social-login-app-server
spec:
  type: NodePort              # The service will be exposed by opening a Port on each node and proxying it.
  selector:
    app: social-login-app-server   # The service exposes Pods with label `app=social-login-app-server`
  ports:                      # Forward incoming connections on port 8080 to the target port 8080
  - name: http
    port: 8080
    targetPort: 8080
Deploy Spring Boot Application by applying the YAML configuration
kubectl apply -f k8s/app-server.yml
Output
deployment.apps/social-login-app-server created
service/social-login-app-server created
Deploy Angular on Kubernetes
The following manifest will create a deployment resource and a service resource for Angular application.
k8s/app-client.yml
apiVersion: apps/v1             # API version
kind: Deployment                # Type of kubernetes resource
metadata:
  name: social-login-app-client      # Name of the kubernetes resource
spec:
  replicas: 1                   # No of replicas/pods to run
  selector:
    matchLabels:                # This deployment applies to Pods matching the specified labels
      app: social-login-app-client
  template:                     # Template for creating the Pods in this deployment
    metadata:
      labels:                   # Labels that will be applied to all the Pods in this deployment
        app: social-login-app-client
    spec:                       # Spec for the containers that will run inside the Pods
      containers:
      - name: social-login-app-client
        image: javachinna/social-login-app-client:1.0.0
        imagePullPolicy: Always
        ports:
          - name: http
            containerPort: 80   # Should match the Port that the container listens on
        resources:
          limits:
            cpu: 0.2
            memory: "10Mi"
---
apiVersion: v1                  # API version
kind: Service                   # Type of kubernetes resource
metadata:
  name: social-login-app-client      # Name of the kubernetes resource
spec:
  type: NodePort                # Exposes the service by opening a port on each node
  selector:
    app: social-login-app-client     # Any Pod matching the label `app=social-login-app-client` will be picked up by this service
  ports:                        # Forward incoming connections on port 8081 to the target port 80 in the Pod
  - name: http
    port: 8081
    targetPort: 80
Deploy Angular application by applying the YAML configuration
kubectl apply -f k8s/app-client.yml
Output
deployment.apps/social-login-app-client created
service/social-login-app-client created
Install Kubernetes Nginx Ingress Controller
In this step, we’ll roll out v0.45.0 of the Kubernetes-maintained Nginx Ingress Controller into our Cluster. This Controller will create a LoadBalancer Service that provisions a DigitalOcean Load Balancer to which all external traffic will be directed. This Load Balancer will route external traffic to the Ingress Controller Pod running Nginx, which then forwards traffic to the appropriate backend Services.
kubectl apply -f https://raw.githubusercontent.com/kubernetes/ingress-nginx/controller-v0.45.0/deploy/static/provider/do/deploy.yaml
Output
namespace/ingress-nginx created
serviceaccount/ingress-nginx created
configmap/ingress-nginx-controller created
clusterrole.rbac.authorization.k8s.io/ingress-nginx created
clusterrolebinding.rbac.authorization.k8s.io/ingress-nginx created
role.rbac.authorization.k8s.io/ingress-nginx created
rolebinding.rbac.authorization.k8s.io/ingress-nginx created
service/ingress-nginx-controller-admission created
service/ingress-nginx-controller created
deployment.apps/ingress-nginx-controller created
validatingwebhookconfiguration.admissionregistration.k8s.io/ingress-nginx-admiss
ion created
serviceaccount/ingress-nginx-admission created
clusterrole.rbac.authorization.k8s.io/ingress-nginx-admission created
clusterrolebinding.rbac.authorization.k8s.io/ingress-nginx-admission created
role.rbac.authorization.k8s.io/ingress-nginx-admission created
rolebinding.rbac.authorization.k8s.io/ingress-nginx-admission created
job.batch/ingress-nginx-admission-create created
job.batch/ingress-nginx-admission-patch created
Verify that the DigitalOcean Load Balancer was successfully created by fetching the Service details
kubectl get svc --namespace=ingress-nginx
Output
NAME                                 TYPE           CLUSTER-IP       EXTERNAL-IP
     PORT(S)                      AGE
ingress-nginx-controller             LoadBalancer   10.245.254.145   139.59.49.1
61   80:31746/TCP,443:31958/TCP   8m58s
ingress-nginx-controller-admission   ClusterIP      10.245.239.197   <none>
     443/TCP                      8m59s
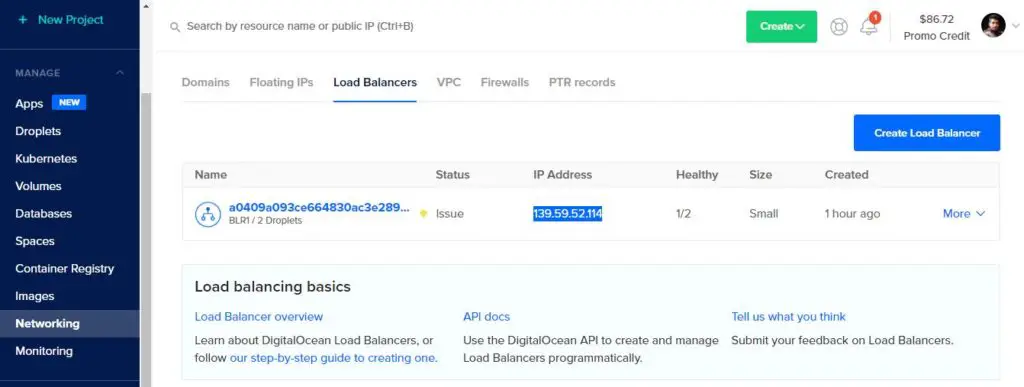
Note down the Load Balancer’s external IP address, as you’ll need it in a later step. If it is in <pending> state, wait for some time for the IP address to be assigned to the Load Balancer, and re-run the command again. You can also check the progress of the Load Balancer being provisioned in Networking -> Load Balancers as shown below
DigitalOcean Load Balancer
This Load Balancer is automatically created by the Load Balancer Service.
Add a Domain
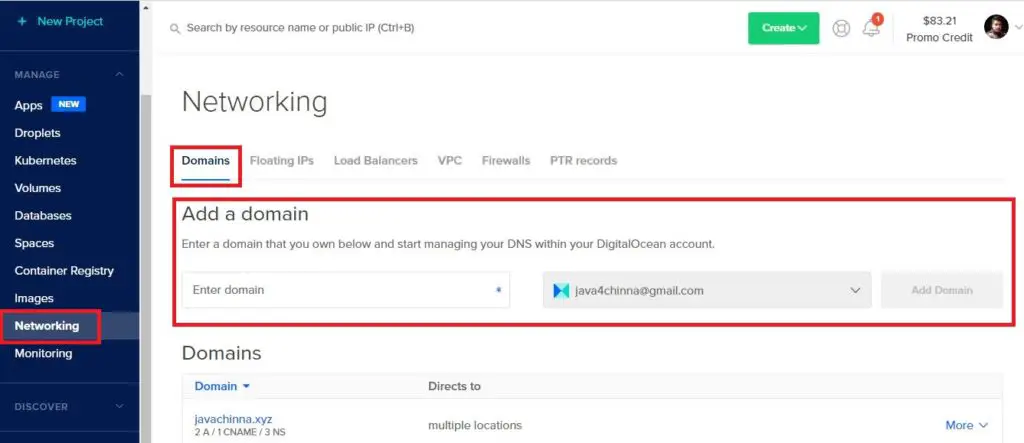
We need to add our domain javachinna.xyz in DigitalOcean. Select the Networking menu on the left and select the Domains tab and add the domain
Create DNS Records
Once the domain is added, click on domain name and create DNS records to point to the external Load Balancer.
Create A Record for Client

Create A Record for Server

Expose the App Using an Ingress
Create an Ingress Resource to implement traffic routing rules.
ingress-nginx.yml
apiVersion: networking.k8s.io/v1
kind: Ingress
metadata:
  name: social-login-app-ingress
  annotations:
    kubernetes.io/ingress.class: nginx
spec:
  rules:
  - host: "client.javachinna.xyz"
    http:
      paths:
      - pathType: Prefix
        path: /
        backend:
          service:
            name: social-login-app-client
            port:
              number: 80
  - host: "server.javachinna.xyz"
    http:
      paths:
      - pathType: Prefix
        path: /api/
        backend:
          service:
            name: social-login-app-server
            port:
              number: 8080
      - pathType: Prefix
        path: /oauth2/
        backend:
          service:
            name: social-login-app-server
            port:
              number: 8080
In the above configuration, we are forwarding the traffic to social-login-app-server service running on port 8080 if the hostname is server.javachinna.xyz and the path starts with /api/ or /oauth2/ .
If the hostname is client.javachinna.xyz, then the traffic will be forwarded to social-login-app-client service running on port 80
Deploy Ingress Resource by applying the YAML configuration
kubectl apply -f k8s/ingress-nginx.yml
Output
ingress.networking.k8s.io/social-login-app-ingress created
Installing and Configuring Cert-Manager
Now, we’ll install v1.3.0 of cert-manager into our cluster. cert-manager is a Kubernetes add-on that provisions TLS certificates from Let’s Encrypt and other certificate authorities (CAs) and manages their lifecycles. Certificates can be automatically requested and configured by annotating Ingress Resources, appending a tls section to the Ingress spec, and configuring one or more Issuers or ClusterIssuers to specify your preferred certificate authority. To learn more about Issuer and ClusterIssuer objects, refer the official cert-manager documentation on Issuers.
Install cert-manager and its Custom Resource Definitions (CRDs) like Issuers and ClusterIssuers by following the official installation instructions. Note that a namespace called cert-manager will be created into which the cert-manager objects will be created
kubectl apply --validate=false -f https://github.com/jetstack/cert-manager/releases/download/v1.3.0/cert-manager.yaml
Output
customresourcedefinition.apiextensions.k8s.io/certificaterequests.cert-manager.io created
customresourcedefinition.apiextensions.k8s.io/certificates.cert-manager.io created
customresourcedefinition.apiextensions.k8s.io/challenges.acme.cert-manager.io created
customresourcedefinition.apiextensions.k8s.io/clusterissuers.cert-manager.io created
customresourcedefinition.apiextensions.k8s.io/issuers.cert-manager.io created
customresourcedefinition.apiextensions.k8s.io/orders.acme.cert-manager.io created
namespace/cert-manager created
...
service/cert-manager created
service/cert-manager-webhook created
deployment.apps/cert-manager-cainjector created
deployment.apps/cert-manager created
deployment.apps/cert-manager-webhook created
mutatingwebhookconfiguration.admissionregistration.k8s.io/cert-manager-webhook created
validatingwebhookconfiguration.admissionregistration.k8s.io/cert-manager-webhook created
Verify the Cert-Manager Pods are created and running in the cert-manager
kubectl get pods --namespace cert-manager
Output
NAME                                       READY   STATUS    RESTARTS   AGE
cert-manager-68ff46b886-ccqdb              1/1     Running   0          5m3s
cert-manager-cainjector-7cdbb9c945-w8sb9   1/1     Running   0          5m4s
cert-manager-webhook-67584ff488-gxgcz      1/1     Running   0          5m3s
Create ClusterIssuer
Before we begin issuing certificates for our client.javachinna.xyz and server.javachinna.xyz domains, we need to create an Issuer, which specifies the certificate authority from which signed x509 certificates can be obtained. In this guide, we’ll use the Let’s Encrypt certificate authority, which provides free TLS certificates and offers both a staging server for testing your certificate configuration and a production server for rolling out verifiable TLS certificates.
Create Staging ClusterIssuer (Optional)
Let’s create a Staging ClusterIssuer. A ClusterIssuer is not namespace-scoped and can be used by Certificate resources in any namespace.
k8s/staging-issuer.yml
apiVersion: cert-manager.io/v1
kind: ClusterIssuer
metadata:
  name: letsencrypt-staging
spec:
  acme:
    # Email address used for ACME registration
    email: [email protected]
    server: https://acme-staging-v02.api.letsencrypt.org/directory
    privateKeySecretRef:
      # Name of a secret used to store the ACME account private key
      name: letsencrypt-staging-private-key
    # Add a single challenge solver, HTTP01 using nginx
    solvers:
    - http01:
        ingress:
          class: nginx
Here we specify that we’d like to create a ClusterIssuer called letsencrypt-staging, and use the Let’s Encrypt staging server. Make sure to replace [email protected] with your email address
We are gonna use the production server to roll out our certificates, but the production server rate-limits requests made against it, so for testing purposes, you should use the staging URL.
Apply the Staging ClusterIssuer Configuation
kubectl apply -f k8s/staging-issuer.yml
Output
clusterissuer.cert-manager.io/letsencrypt-staging created
Note: The certificates will only be created after annotating and updating the Ingress resource
Create Production ClusterIssuer
k8s/prod-issuer.yml
apiVersion: cert-manager.io/v1
kind: ClusterIssuer
metadata:
  name: letsencrypt-prod
spec:
  acme:
    # Email address used for ACME registration
    email: [email protected]
    server: https://acme-v02.api.letsencrypt.org/directory
    privateKeySecretRef:
      # Name of a secret used to store the ACME account private key
      name: letsencrypt-prod-private-key
    # Add a single challenge solver, HTTP01 using nginx
    solvers:
    - http01:
        ingress:
          class: nginx
Note the different ACME server URL, and the letsencrypt-prod secret key name. Make sure to replace [email protected] with your email address
Apply the Production ClusterIssuer Configuation
kubectl apply -f k8s/prod-issuer.yml
Output
clusterissuer.cert-manager.io/letsencrypt-prod created
Install hairpin-proxy for Cert-Manager Self Check Issue
Because of an existing limitation in upstream Kubernetes, pods cannot talk to other pods via the IP address of an external load-balancer set up through a LoadBalancer-typed service. Kubernetes will cause the LB to be bypassed, potentially breaking workflows that expect TLS termination or proxy protocol handling to be applied consistently.
A workaround for this issue is to specify the hostname in the service.beta.kubernetes.io/do-loadbalancer-hostname annotation in the ingress resource. Clients may then connect to the hostname to reach the load-balancer from inside the cluster. However, for some reason, it didn’t work as expected.
If we do a curl http://client.javachinna.xyz/ within a pod, it will fail with Empty reply from server because NGINX expects the PROXY protocol. However, curl with --haproxy-protocol will succeed, indicating that despite the external-appearing IP address, the traffic is being rewritten by Kubernetes to bypass the external load balancer.
When using Cert-manager for provisioning SSL certificates, it uses HTTP01 validation, and before asking LetsEncrypt to hit http://subdomain.example.com/.well-known/acme-challenge/some-special-code, it tries to access this URL itself as a self-check. This fails with the following error. Cert-manager does not allow you to skip the self-check. As a result, your certificate is never provisioned, even though the verification URL would be perfectly accessible externally.
Reason: Waiting for HTTP-01 challenge propagation: failed to perform self check GET request 'http://client.javachinna.xyz/.well-known/acme-challenge/IivW
HvJltFZZ6GaDSM1kj7VAXKT0fQe7KwDa6o4xJw': Get "http://client.javachinna.xyz/.wel
-known/acme-challenge/IivWmHvJltFZZ6GaDSM1kj7VAXKT0fQe7KwDa6o4xJw": EOF
So the solution to fix this issue is to install hairpin-proxy with the following command
kubectl apply -f https://raw.githubusercontent.com/compumike/hairpin-proxy/v0.2.1/deploy.yml
Output
namespace/hairpin-proxy created
deployment.apps/hairpin-proxy-haproxy created
service/hairpin-proxy created
serviceaccount/hairpin-proxy-controller-sa created
clusterrole.rbac.authorization.k8s.io/hairpin-proxy-controller-cr created
clusterrolebinding.rbac.authorization.k8s.io/hairpin-proxy-controller-crb created
role.rbac.authorization.k8s.io/hairpin-proxy-controller-r created
rolebinding.rbac.authorization.k8s.io/hairpin-proxy-controller-rb created
deployment.apps/hairpin-proxy-controller created
Configure Ingress To Use Production ClusterIssuer
To issue a production TLS certificate for our domains, we’ll annotate ingress-nginx.yml with the Production ClusterIssuer created in the previous step. This will use ingress-shim to automatically create and issue certificates for the domains specified in the Ingress manifest.
Instead of modifying the same file, I have copied it to a new file ingress-nginx-https.yml and added the annotations and tls section in the spec highlighted below. You can modify the same file if you wish.
k8s/ingress-nginx-https.yml
apiVersion: networking.k8s.io/v1
kind: Ingress
metadata:
  name: social-login-app-ingress
  annotations:
    kubernetes.io/ingress.class: nginx
    cert-manager.io/cluster-issuer: letsencrypt-prod
spec:
  tls:
  - hosts:
    - client.javachinna.xyz
    - server.javachinna.xyz
    secretName: social-login-app-tls
  rules:
  - host: "client.javachinna.xyz"
    http:
      paths:
      - pathType: Prefix
        path: /
        backend:
          service:
            name: social-login-app-client
            port:
              number: 80
  - host: "server.javachinna.xyz"
    http:
      paths:
      - pathType: Prefix
        path: /api/
        backend:
          service:
            name: social-login-app-server
            port:
              number: 8080
      - pathType: Prefix
        path: /oauth2/
        backend:
          service:
            name: social-login-app-server
            port:
              number: 8080
Note: For testing you need to use the letsencrypt-staging ClusterIssuer instead of letsencrypt-prod.
Apply the configuration changes
kubectl apply -f k8s/ingress-nginx-https.yml
Output
ingress.networking.k8s.io/social-login-app-ingress changed
Confirm that your CoreDNS configuration was updated by hairpin-proxy
kubectl get configmap -n kube-system coredns -o=jsonpath='{.data.Corefile}'
Once the hairpin-proxy-controller pod starts, you should immediately see one rewrite line per TLS-enabled ingress host, such as:
rewrite name subdomain.example.com hairpin-proxy.hairpin-proxy.svc.cluster.local # Added by hairpin-proxy
You can get the list of certificates. If the certificate is not ready yet, wait for a couple of minutes for the Let’s Encrypt production server to issue the certificate.
kubectl get certificates
Output
NAME                   READY   SECRET                 AGE
social-login-app-tls   True    social-login-app-tls   17h
You can track its progress using kubectl describe on the certificate object
kubectl describe certificate certificate_name
For trouble shooting Cert-Manager issues, refer here and here.
Verify the Application
Now the application can be reached with https://client.javachinna.xyz/ from the browser
References
https://www.callicoder.com/deploy-spring-mysql-react-nginx-kubernetes-persistent-volume-secret
https://docs.digitalocean.com/products/kubernetes/how-to/connect-to-cluster/
Source Code
https://github.com/JavaChinna/angular-spring-boot-mysql-kubernetes
Conclusion
That’s all folks. In this article, we have deployed our Spring Boot Angular application on Digital Ocean Kubernetes.
Thank you for reading.

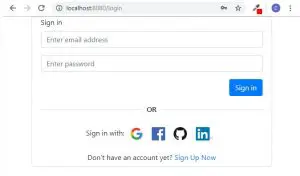
All of the social logins work for me on localhost (without Kubernetes), but when I push to my domain via Kubernetes I get a 404 unknown nginx error. On the login screen if I choose either Google, GitHub, or LinkedIn I am prompted to enter username and password. After I enter social login and password I am presented with a “404 unknown nginx error” on the page.
After googling some it seems maybe the nginx-ingress controller needs these fields to be populated?????
annotations:
nginx.ingress.kubernetes.io/auth-url: “https://$host/oauth2/auth”
nginx.ingress.kubernetes.io/auth-signin: “https://$host/oauth2/start?rd=$escaped_request_uri”
Is that right or is it not needed based on the way you have it setup already?
I don’t think it is needed. My setup worked fine when I tested. If I understood correctly, it goes to the respective social login provider page where you enter your credentials, and after this point, it fails to redirect back to the client app. Maybe your angular client URL is still pointing to localhost? If this is the case, then check if you have done the following changes:
If this is already done correctly, then you can look for the actual URL for which Nginx sends a 404 in the Nginx log.
Hello, I would like to ask you if there is any (security) difference between securing spring boot app like this
server.ssl.key-store=classpath:keystore/cert.p12
server.ssl.key-store-type=PKCS12
server.ssl.key-store-password=password
or doing it on nginx ClusterIssuer level?
Hi ,
My backend pod is crashing in every min, no specific error in the log
$ kubectl logs -f social-login-app-server-78b9d7fdd6-glvqv –namespace=ingress-nginx
. ____ _ __ _ _
/\\ / ___’_ __ _ _(_)_ __ __ _ \ \ \ \
( ( )\___ | ‘_ | ‘_| | ‘_ \/ _` | \ \ \ \
\\/ ___)| |_)| | | | | || (_| | ) ) ) )
‘ |____| .__|_| |_|_| |_\__, | / / / /
=========|_|==============|___/=/_/_/_/
:: Spring Boot :: (v2.4.0)
2024-03-04 16:55:03.956 INFO 1 — [ main] com.javachinna.DemoApplication : Starting DemoApplication using Java 11.0.10 on social-login-app-server-78b9d7fdd6-glvqv with PID 1 (/app started by root in /)
2024-03-04 16:55:03.959 INFO 1 — [ main] com.javachinna.DemoApplication : No active profile set, falling back to default profiles: default
2024-03-04 16:55:16.755 INFO 1 — [ main] .s.d.r.c.RepositoryConfigurationDelegate : Bootstrapping Spring Data JPA repositories in DEFAULT mode.
2024-03-04 16:55:17.754 INFO 1 — [ main] .s.d.r.c.RepositoryConfigurationDelegate : Finished Spring Data repository scanning in 991 ms. Found 2 JPA repository interfaces.
2024-03-04 16:55:24.258 INFO 1 — [ main] trationDelegate$BeanPostProcessorChecker : Bean ‘org.springframework.security.access.expression.method.DefaultMethodSecurityExpressionHandler@6aba5d30’ of type [org.springframework.security.access.expression.method.DefaultMethodSecurityExpressionHandler] is not eligible for getting processed by all BeanPostProcessors (for example: not eligible for auto-proxying)
2024-03-04 16:55:24.359 INFO 1 — [ main] trationDelegate$BeanPostProcessorChecker : Bean ‘methodSecurityMetadataSource’ of type [org.springframework.security.access.method.DelegatingMethodSecurityMetadataSource] is not eligible for getting processed by all BeanPostProcessors (for example: not eligible for auto-proxying)
2024-03-04 16:55:28.159 INFO 1 — [ main] o.s.b.w.embedded.tomcat.TomcatWebServer : Tomcat initialized with port(s): 8080 (http)
2024-03-04 16:55:28.258 INFO 1 — [ main] o.apache.catalina.core.StandardService : Starting service [Tomcat]
2024-03-04 16:55:28.259 INFO 1 — [ main] org.apache.catalina.core.StandardEngine : Starting Servlet engine: [Apache Tomcat/9.0.39]
2024-03-04 16:55:29.556 INFO 1 — [ main] o.a.c.c.C.[Tomcat].[localhost].[/] : Initializing Spring embedded WebApplicationContext
2024-03-04 16:55:29.556 INFO 1 — [ main] w.s.c.ServletWebServerApplicationContext : Root WebApplicationContext: initialization completed in 24096 ms
2024-03-04 16:55:31.151 WARN 1 — [ main] JpaBaseConfiguration$JpaWebConfiguration : spring.jpa.open-in-view is enabled by default. Therefore, database queries may be performed during view rendering. Explicitly configure spring.jpa.open-in-view to disable this warning
2024-03-04 16:55:32.757 INFO 1 — [ main] o.hibernate.jpa.internal.util.LogHelper : HHH000204: Processing PersistenceUnitInfo [name: default]
my backend pod is not running its restarting every 1min and getting CrashLoopBackoff
social-login-app-server-c66bff456-kpt5r 0/1 CrashLoopBackOff 4 (48s ago) 4m51s
riya [ ~/three-tier ]$ kubectl logs -f social-login-app-server-c66bff456-kpt5r –namespace=ingress-nginx
. ____ _ __ _ _
/\\ / ___’_ __ _ _(_)_ __ __ _ \ \ \ \
( ( )\___ | ‘_ | ‘_| | ‘_ \/ _` | \ \ \ \
\\/ ___)| |_)| | | | | || (_| | ) ) ) )
‘ |____| .__|_| |_|_| |_\__, | / / / /
=========|_|==============|___/=/_/_/_/
:: Spring Boot :: (v2.4.0)
2024-03-04 17:12:41.057 INFO 1 — [ main] com.javachinna.DemoApplication : Starting DemoApplication using Java 11.0.10 on social-login-app-server-c66bff456-kpt5r with PID 1 (/app started by root in /)
2024-03-04 17:12:41.161 INFO 1 — [ main] com.javachinna.DemoApplication : No active profile set, falling back to default profiles: default
2024-03-04 17:12:54.557 INFO 1 — [ main] .s.d.r.c.RepositoryConfigurationDelegate : Bootstrapping Spring Data JPA repositories in DEFAULT mode.
2024-03-04 17:12:55.553 INFO 1 — [ main] .s.d.r.c.RepositoryConfigurationDelegate : Finished Spring Data repository scanning in 798 ms. Found 2 JPA repository interfaces.
2024-03-04 17:13:02.357 INFO 1 — [ main] trationDelegate$BeanPostProcessorChecker : Bean ‘org.springframework.security.access.expression.method.DefaultMethodSecurityExpressionHandler@1ff55ff’ of type [org.springframework.security.access.expression.method.DefaultMethodSecurityExpressionHandler] is not eligible for getting processed by all BeanPostProcessors (for example: not eligible for auto-proxying)
2024-03-04 17:13:02.457 INFO 1 — [ main] trationDelegate$BeanPostProcessorChecker : Bean ‘methodSecurityMetadataSource’ of type [org.springframework.security.access.method.DelegatingMethodSecurityMetadataSource] is not eligible for getting processed by all BeanPostProcessors (for example: not eligible for auto-proxying)
riya [ ~/three-tier ]$
kubectl logs -f social-login-app-server-c66bff456-kpt5r –namespace=ingress-nginx
. ____ _ __ _ _
/\\ / ___’_ __ _ _(_)_ __ __ _ \ \ \ \
( ( )\___ | ‘_ | ‘_| | ‘_ \/ _` | \ \ \ \
\\/ ___)| |_)| | | | | || (_| | ) ) ) )
‘ |____| .__|_| |_|_| |_\__, | / / / /
=========|_|==============|___/=/_/_/_/
:: Spring Boot :: (v2.4.0)
2024-03-04 17:11:22.054 INFO 1 — [ main] com.javachinna.DemoApplication : Starting DemoApplication using Java 11.0.10 on social-login-app-server-c66bff456-kpt5r with PID 1 (/app started by root in /)
2024-03-04 17:11:22.152 INFO 1 — [ main] com.javachinna.DemoApplication : No active profile set, falling back to default profiles: default
2024-03-04 17:11:33.566 INFO 1 — [ main] .s.d.r.c.RepositoryConfigurationDelegate : Bootstrapping Spring Data JPA repositories in DEFAULT mode.
2024-03-04 17:11:34.959 INFO 1 — [ main] .s.d.r.c.RepositoryConfigurationDelegate : Finished Spring Data repository scanning in 1298 ms. Found 2 JPA repository interfaces.