In the previous article we have implemented a REST API without using Spring Boot. In this article we are gonna implement RESTful services using Spring Boot in 7 simple steps.
What you’ll build
Spring Boot RESTful services to perform Product CRUD operations
What you’ll need
- Spring Tool Suite 4
- JDK 11
- MySQL Server 8
- Maven
- Postman
Tech Stack
- Spring Boot 2.2.6
- JDK 11
- Lombok
Introduction to Lombok
Project Lombok is a Java library tool that is used to minimize boilerplate code and save time during development.
Lombok generates code for model/data objects , for example, it generates getters, setters, equals, hashCode and toString in the “.class” file directly.
The offical lombok website can be found here: https://projectlombok.org/
Let’s Get Started
Step 1: Bootstrap your application
You can initialize your spring boot application with required dependencies as shown below and download it from here.
Import the downloaded project into your favourite IDE like STS or IntelliJ.
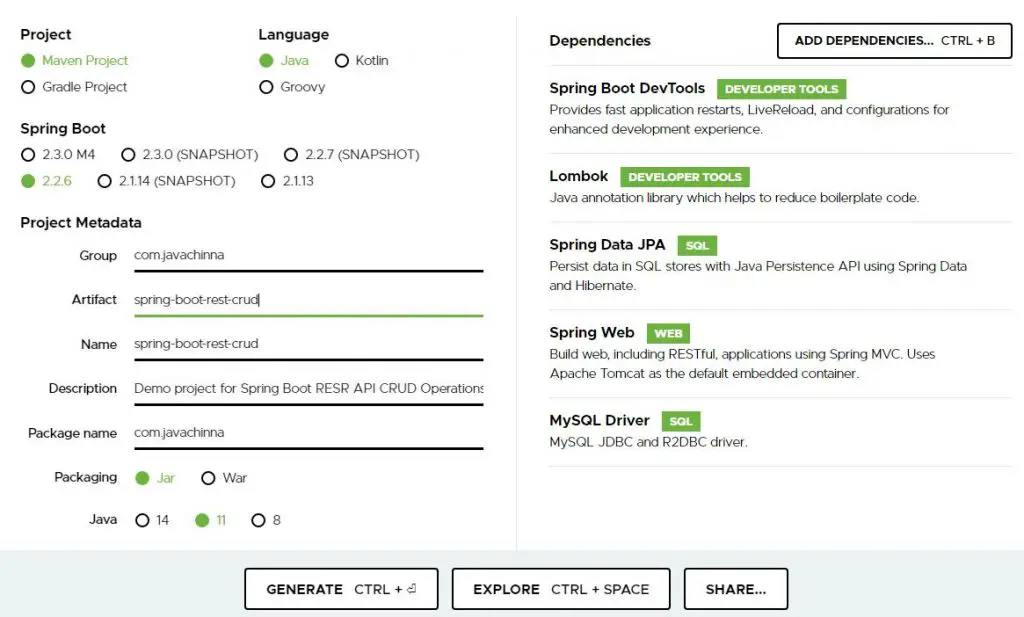
Once imported, you should have pom.xml and SpringBootRestCrudApplication class as shown below
pom.xml
<?xml version="1.0" encoding="UTF-8"?>
<project xmlns="http://maven.apache.org/POM/4.0.0" xmlns:xsi="http://www.w3.org/2001/XMLSchema-instance"
	xsi:schemaLocation="http://maven.apache.org/POM/4.0.0 https://maven.apache.org/xsd/maven-4.0.0.xsd">
	<modelVersion>4.0.0</modelVersion>
	<parent>
		<groupId>org.springframework.boot</groupId>
		<artifactId>spring-boot-starter-parent</artifactId>
		<version>2.2.6.RELEASE</version>
		<relativePath/> <!-- lookup parent from repository -->
	</parent>
	<groupId>com.javachinna</groupId>
	<artifactId>spring-boot-rest-crud</artifactId>
	<version>0.0.1-SNAPSHOT</version>
	<name>spring-boot-rest-crud</name>
	<description>Demo project for Spring Boot REST API CRUD Operations</description>

	<properties>
		<java.version>11</java.version>
	</properties>

	<dependencies>
		<dependency>
			<groupId>org.springframework.boot</groupId>
			<artifactId>spring-boot-starter-data-jpa</artifactId>
		</dependency>
		<dependency>
			<groupId>org.springframework.boot</groupId>
			<artifactId>spring-boot-starter-web</artifactId>
		</dependency>
		<dependency>
			<groupId>org.springframework.boot</groupId>
			<artifactId>spring-boot-devtools</artifactId>
			<scope>runtime</scope>
			<optional>true</optional>
		</dependency>
		<dependency>
			<groupId>mysql</groupId>
			<artifactId>mysql-connector-java</artifactId>
			<scope>runtime</scope>
		</dependency>
		<dependency>
			<groupId>org.projectlombok</groupId>
			<artifactId>lombok</artifactId>
			<optional>true</optional>
		</dependency>
		<dependency>
			<groupId>org.springframework.boot</groupId>
			<artifactId>spring-boot-starter-test</artifactId>
			<scope>test</scope>
			<exclusions>
				<exclusion>
					<groupId>org.junit.vintage</groupId>
					<artifactId>junit-vintage-engine</artifactId>
				</exclusion>
			</exclusions>
		</dependency>
		<dependency>
			<groupId>org.springframework.security</groupId>
			<artifactId>spring-security-test</artifactId>
			<scope>test</scope>
		</dependency>
	</dependencies>

	<build>
		<plugins>
			<plugin>
				<groupId>org.springframework.boot</groupId>
				<artifactId>spring-boot-maven-plugin</artifactId>
			</plugin>
		</plugins>
	</build>

</project>
SpringBootRestCrudApplication.java
@SpringBootApplication Indicates a configuration class that declares one or more @Bean methods and also triggers auto-configuration and component scanning. This is a convenience annotation that is equivalent to declaring @Configuration, @EnableAutoConfiguration and @ComponentScan
package com.javachinna;

import org.springframework.boot.SpringApplication;
import org.springframework.boot.autoconfigure.SpringBootApplication;

@SpringBootApplication
public class SpringBootRestCrudApplication {

	public static void main(String[] args) {
		SpringApplication.run(SpringBootRestCrudApplication.class, args);
	}
}
Step 2: Create JPA Domain Entities
@NoArgsConstructor generates a no-args constructor.
@AllArgsConstructor generates an all-args constructor.
@Data generates getters for all fields, a useful toString method, and hashCode and equals implementations that check all non-transient fields. Will also generate setters for all non-final fields, as well as a constructor. Equivalent to @Getter @Setter @RequiredArgsConstructor @ToString @EqualsAndHashCode.
Product.java
package com.javachinna.model;

import javax.persistence.Entity;
import javax.persistence.GeneratedValue;
import javax.persistence.GenerationType;
import javax.persistence.Id;

import lombok.AllArgsConstructor;
import lombok.Data;
import lombok.NoArgsConstructor;

@NoArgsConstructor
@AllArgsConstructor
@Data
@Entity
public class Product {
	@Id
	@GeneratedValue(strategy = GenerationType.IDENTITY)
	private Long id;
	private String name;
	private String price;
}
Step 3: Create JPA Repositories
ProductRepository.java
Spring Data JPA provides a repository programming model that starts with an interface per managed domain object
Defining this interface serves two purposes: First, by extending JpaRepository we get a bunch of generic CRUD methods into our type that allows saving Products, deleting them and so on. Second, this will allow the Spring Data JPA repository infrastructure to scan the classpath for this interface and create a Spring bean for it.
@Repository
public interface ProductRepository extends JpaRepository<Product, Long> {
}
Note: If you want to execute a custom query , then you can define a custom abstract method in the interface and annotate the method with the
@Queryannotation to define the query that you want to execute. For more information go through Spring Data JPA Documentation.
Step 4: Implement Service Layer
ProductService.java
package com.javachinna.service;

import java.util.List;
import java.util.Optional;

import com.javachinna.model.Product;

public interface ProductService {
	Product save(Product product);

	void deleteById(Long id);

	Optional<Product> findById(Long id);

	List<Product> findAll();
}
ProductServiceImpl.java
package com.javachinna.service.impl;

import java.util.List;
import java.util.Optional;

import org.springframework.beans.factory.annotation.Autowired;
import org.springframework.stereotype.Service;

import com.javachinna.model.Product;
import com.javachinna.repo.ProductRepository;
import com.javachinna.service.ProductService;;

@Service
public class ProductServiceImpl implements ProductService {

	@Autowired
	private ProductRepository productRepository;

	@Override
	public Product save(Product product) {
		return productRepository.save(product);
	}

	@Override
	public void deleteById(Long id) {
		productRepository.deleteById(id);
	}

	@Override
	public Optional<Product> findById(Long id) {
		return productRepository.findById(id);
	}

	@Override
	public List<Product> findAll() {
		return productRepository.findAll();
	}
}
Step 5: Create Custom Exception
ResourceNotFoundException.java
@ResponseStatus annotation marks a method or exception class with the status code and reason that should be returned.
package com.javachinna.exception;

import org.springframework.http.HttpStatus;
import org.springframework.web.bind.annotation.ResponseStatus;

@ResponseStatus(HttpStatus.NOT_FOUND)
public class ResourceNotFoundException extends RuntimeException {
	private static final long serialVersionUID = 1L;

	public ResourceNotFoundException() {
		super();
	}

	public ResourceNotFoundException(String message) {
		super(message);
	}

	public ResourceNotFoundException(String message, Throwable cause) {
		super(message, cause);
	}
}
Step 6: Create Controller
ProductController.java
Controller class for exposing the REST API’s. @RestController is a convenience annotation that is itself annotated with @Controller and @ResponseBody.
@GetMapping annotation is used for mapping HTTP GET requests onto specific handler
@PostMapping annotation is used for mapping HTTP POST requests onto specific handler
@PutMapping annotation is used for mapping HTTP PUT requests onto specific handler
@DeleteMapping annotation is used for mapping HTTP DELETE requests onto specific handler
@RequestParam annotation indicates that a method parameter should be bound to a web request parameter
@RequestBody annotation indicates that a method parameter should be bound to the body of the web request. The body of the request is passed through an HttpMessageConverter to resolve the method argument depending on the content type of the request.
@PathVariable annotation indicates that a method parameter should be bound to a URI template variable.
package com.javachinna.controller;

import java.util.List;

import org.springframework.beans.factory.annotation.Autowired;
import org.springframework.web.bind.annotation.DeleteMapping;
import org.springframework.web.bind.annotation.GetMapping;
import org.springframework.web.bind.annotation.PathVariable;
import org.springframework.web.bind.annotation.PostMapping;
import org.springframework.web.bind.annotation.PutMapping;
import org.springframework.web.bind.annotation.RequestBody;
import org.springframework.web.bind.annotation.RequestParam;
import org.springframework.web.bind.annotation.RestController;

import com.javachinna.exception.ResourceNotFoundException;
import com.javachinna.model.Product;
import com.javachinna.service.ProductService;

import lombok.extern.slf4j.Slf4j;

@Slf4j
@RestController
public class ProductController {

	@Autowired
	private ProductService productService;

	@GetMapping("/products")
	public List<Product> getProductList(@RequestParam String consumerKey) {
		log.info("Consumer: {}", consumerKey);
		return productService.findAll();
	}

	@GetMapping("/products/{productId}")
	public Product getProduct(@PathVariable(value = "productId") Long productId) {
		return productService.findById(productId).orElseThrow(() -> new ResourceNotFoundException("productId " + productId + " not found"));
	}

	@PostMapping("/products")
	public String createProduct(@RequestBody Product product) {
		productService.save(product);
		return "Product added";
	}

	@PutMapping("/products/{productId}")
	public String updateProduct(@PathVariable(value = "productId") Long productId, @RequestBody Product product) {
		return productService.findById(productId).map(p -> {
			p.setName(product.getName());
			p.setPrice(product.getPrice());
			productService.save(p);
			return "Product updated";
		}).orElseThrow(() -> new ResourceNotFoundException("productId " + productId + " not found"));
	}

	@DeleteMapping("/products/{productId}")
	public String deleteProduct(@PathVariable(value = "productId") Long productId) {
		return productService.findById(productId).map(p -> {
			productService.deleteById(productId);
			return "Product deleted";
		}).orElseThrow(() -> new ResourceNotFoundException("productId " + productId + " not found"));
	}
}
Step 7: Configure database, hibernate and logger
application.properties
# Database configuration props
spring.datasource.url=jdbc:mysql://localhost:3306/rest?createDatabaseIfNotExist=true
spring.datasource.username=root
spring.datasource.password=secret
#spring.datasource.driver-class-name=com.mysql.cj.jdbc.Driver

# hibernate props
spring.jpa.show-sql=true
spring.jpa.hibernate.ddl-auto=create-drop
spring.jpa.properties.hibernate.dialect = org.hibernate.dialect.MySQL5InnoDBDialect
logging.level.root=info
logging.file.path=D:/logs
Note:
spring.jpa.hibernate.ddl-autoproperty values arenone,validate,update,create-drop. Thecreate-dropvalue is used here for creating the database table during application startup and drop it during shutdown. In production, it’s often highly recommended to usenoneor simply don’t specify this property.
Run with Maven
You can run the application using mvn clean spring-boot:run
Testing the Services
We are gonna use the Postman app for testing the REST services
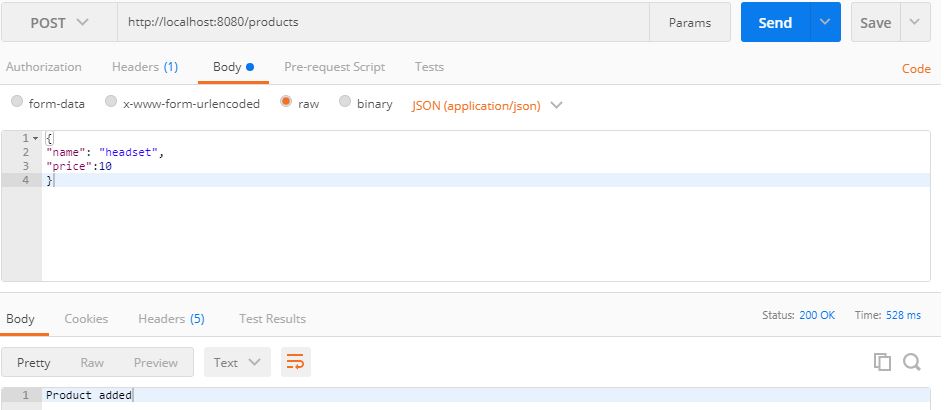
Add new product
Request
POST /products HTTP/1.1
Host: localhost:8080
Content-Type: application/json
Cache-Control: no-cache
Postman-Token: 22c286a8-8a12-f9ee-9400-9f7f5413036c

{
"name": "headset",
"price":10
}
Response
Update Product
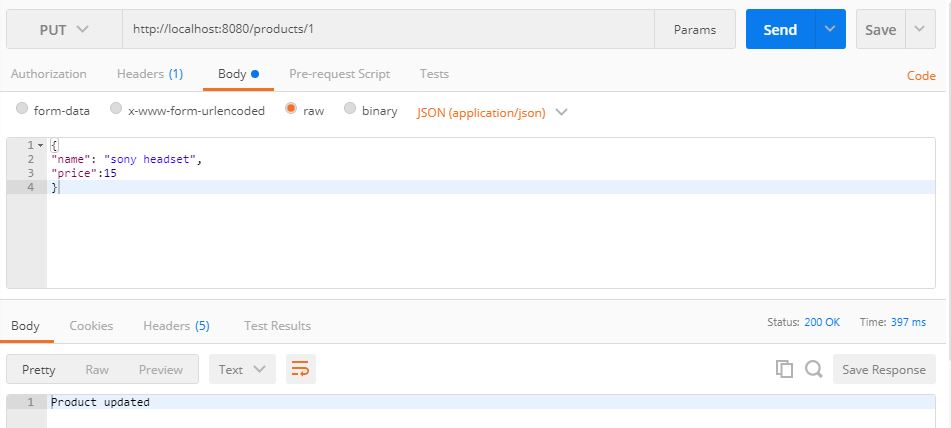
Request
PUT /products/1 HTTP/1.1
Host: localhost:8080
Content-Type: application/json
Cache-Control: no-cache
Postman-Token: da250557-d76d-f6f7-5db3-2ea80a438acf

{
"name": "sony headset",
"price":15
}
Response
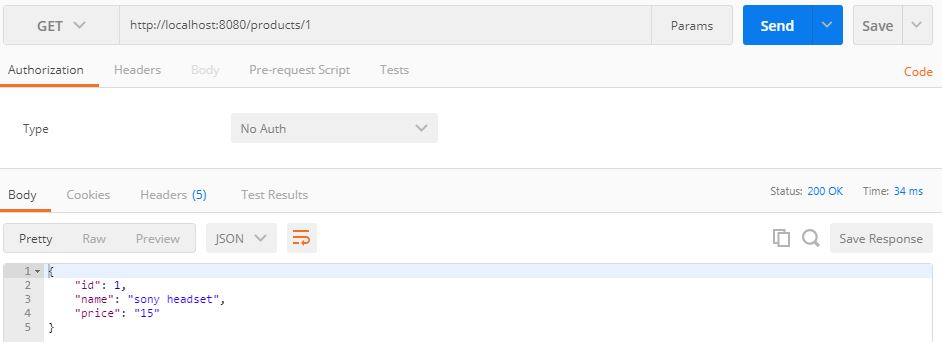
Get product
Request
GET /products/1 HTTP/1.1
Host: localhost:8080
Cache-Control: no-cache
Postman-Token: 982a1ef9-9eb9-01fc-ee0f-f875558c28b7
Response
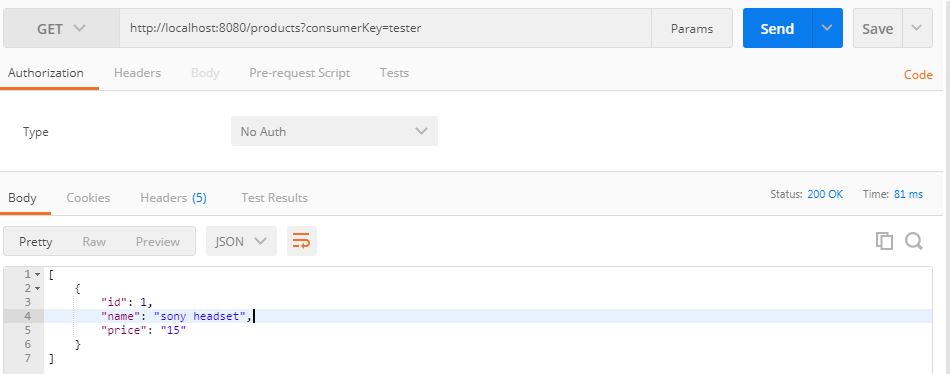
Get all products
Request
GET /products?consumerKey=tester HTTP/1.1
Host: localhost:8080
Cache-Control: no-cache
Postman-Token: bf8232b2-1257-8ab5-3bef-a933aebc904f
Response
Response: When product not found

Delete Product
Request
DELETE /products/1 HTTP/1.1
Host: localhost:8080
Cache-Control: no-cache
Postman-Token: 6dedb57a-9001-4380-0cb0-5107fcd66b45
Content-Type: multipart/form-data; boundary=----WebKitFormBoundary7MA4YWxkTrZu0gW
Response

Source Code
As always, you can get the source code from the Github below
https://github.com/JavaChinna/spring-boot-rest-crud
Conclusion
That’s all folks! In this article, you’ve learned how to implement Spring Boot RESTful services for CRUD operations.
I hope you enjoyed this article. Thank you for reading.
Read Next: Integrating Swagger 2 with Spring Boot 2 RESTful API in 2 Simple Steps


