In the previous article we have implemented a Spring Boot REST CRUD API. Now we are gonna generate REST API Documentation using Swagger 2 for those RESTful services in 2 simple steps.
Introduction to Swagger
Swagger is a set of open-source tools built around the OpenAPI Specification that can help you design, build, document and consume REST APIs. It can generate both machine readable (JSON) and human readable (swagger-ui) documentation for RESTFul web services.
Swagger UI is a collection of HTML, Javascript, and CSS assets that dynamically generate beautiful documentation from an Open API Specification-compliant API like SpringFox.
SpringFox library integrates with Spring MVC with support for Swagger 1.2 and Swagger 2.0 spec. We are gonna use this tool to generate the documentation for our Spring RESTful web services.
Let’s Get Started
Step 1: Add Swagger dependencies
pom.xml
		<dependency>
			<groupId>io.springfox</groupId>
			<artifactId>springfox-swagger2</artifactId>
			<version>2.9.2</version>
		</dependency>
		<dependency>
			<groupId>io.springfox</groupId>
			<artifactId>springfox-swagger-ui</artifactId>
			<version>2.9.2</version>
		</dependency>
Step 2: Configure Swagger 2
SwaggerConfig.java
SwaggerConfig is a Spring configuration class resposible for creating a Docket bean to configure the swagger
@EnableSwagger2 annotation indicates that Swagger support should be enabled
package com.javachinna.config;

import org.springframework.context.annotation.Bean;
import org.springframework.context.annotation.Configuration;

import springfox.documentation.builders.PathSelectors;
import springfox.documentation.builders.RequestHandlerSelectors;
import springfox.documentation.spi.DocumentationType;
import springfox.documentation.spring.web.plugins.Docket;
import springfox.documentation.swagger2.annotations.EnableSwagger2;

@Configuration
@EnableSwagger2
public class SwaggerConfig {
	@Bean
	public Docket api() {
		return new Docket(DocumentationType.SWAGGER_2).select().apis(RequestHandlerSelectors.any()).paths(PathSelectors.any()).build();
	}
}
In this configuration class, the select() method called on the Docket bean instance returns an ApiSelectorBuilder
ApiSelectorBuilder provides the apis() and paths() methods to filter the controllers and methods that are being documented using String predicates.
Run with Maven
You can run the application using mvn clean spring-boot:run and hit the url http://localhost:8080/swagger-ui.html in the browser
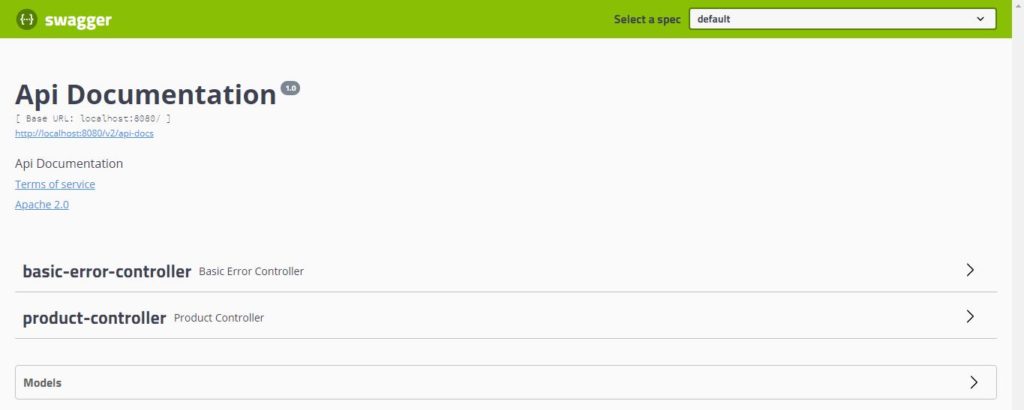
The swagger ui will be displayed with all the controllers including in-built Spring’s BasicErrorController as shown below
JSON Specification
The API dcoumentation in JSON format can be found in the link http://localhost:8080/v2/api-docs which is present below the title as shown below
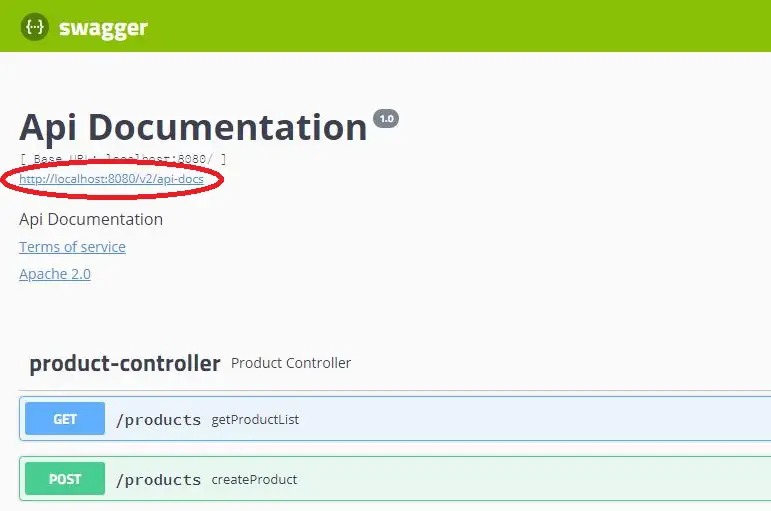
This is the default specification document generated by Swagger.
If you wanna customize the documentation further, then continue reading the following sections.
Filter Request Handlers and Endpoints
This section describes about various methods of selecting the Controllers / Endpoints for Swagger Documentation. However, we will stick to the first approach below in our application.
Select Request Handlers With Base Package
Since we are interested in our ProductController only, we can change the SwaggerConfig as shown below in order to document only our request handlers
@Bean
	public Docket api() {
		return new Docket(DocumentationType.SWAGGER_2).select().apis(RequestHandlerSelectors.basePackage("com.javachinna")).paths(PathSelectors.any()).build();
	}
In the above code, the RequestHandlerSelectors.basePackage predicate matches the com.javachinna base package to filter the request handlers.
Select Request Handlers With Annotation
We can select the Controllers using annotation and add it to Swagger documentation with the following steps
Step 1: Create Annotation
package com.javachinna.config;

import java.lang.annotation.Documented;
import java.lang.annotation.ElementType;
import java.lang.annotation.Retention;
import java.lang.annotation.RetentionPolicy;
import java.lang.annotation.Target;

@Documented
@Retention(RetentionPolicy.RUNTIME)
@Target(ElementType.TYPE)
public @interface AddApiToSwagger {
}
Step 2: Add Annotation to the Controller
@AddApiToSwagger
public class ProductController implements ProductApi {
Step 3: Change SwaggerConfig Class
RequestHandlerSelectors.withClassAnnotation(AddApiToSwagger.class)
Select Methods With Annotation
We can also select the endpoint methods using annotation and add it to Swagger documentation with the following steps
Step 1: Create Annotation
@Documented
@Retention(RetentionPolicy.RUNTIME)
@Target(ElementType.METHOD)
public @interface AddMethodToSwagger {
}
Step 2: Add Annotation to the Methods
	@Override
	@GetMapping("/products")
	@AddMethodToSwagger
	public List<Product> getProductList(@RequestParam String consumerKey) {
Step 3: Change SwaggerConfig Class
RequestHandlerSelectors.withMethodAnnotation(AddMethodToSwagger.class)
Select API Paths
When we need to include or exclude endpoints based on the path, then PathSelectors.ant and PathSelectors.regex predicates can be used instead of PathSelectors.any in the SwaggerConfig. For instance, the following predicate can be used to exclude the /products endpoints from the Swagger documentation and include endpoints with path /products/{productId} only.
PathSelectors.ant("/products/*")
Hide API
We can hide a Controller from Swagger Documentation using @ApiIgnore annotation as shown below
@ApiIgnore
public class ProductController implements ProductApi {
Configure API Meta Information
We are gonna configure API meta information like title, description, version etc., in our SwaggerConfig class using apiInfo method of Docket bean as shown below
@Bean
	public Docket api() {
		return new Docket(DocumentationType.SWAGGER_2).select().apis(RequestHandlerSelectors.basePackage("com.javachinna")).paths(PathSelectors.any()).build().apiInfo(apiInfo());
	}

	private ApiInfo apiInfo() {
		return new ApiInfo("Product REST API", "Product API to perform CRUD opertations", "1.0", "Terms of service",
				new Contact("Java Chinna", "www.javachinna.com", "[email protected]"), "License of API", "API license URL", Collections.emptyList());
	}
The apiInfo() method returns ApiInfo object initialized with information about our API.
Add API Specific Information
The default generated API docs are good but they lack detailed API level information. We can add detailed information to the APIs using the following Swagger annotations.
| @Api | Marks a class as a Swagger resource. |
| @ApiModel | Provides additional information about Swagger models. |
| @ApiModelProperty | Adds and manipulates data of a model property. |
| @ApiOperation | Describes an operation or typically an HTTP method against a specific path. |
| @ApiParam | Adds additional meta-data for operation parameters. |
| @ApiResponse | Describes a possible response of an operation. |
| @ApiResponses | A wrapper to allow a list of multiple ApiResponse objects. |
Create interface with Swagger Annotations
In order to provide detailed API information using Swagger annotations, we are gonna create a new interface with abstract methods and have the Controller implement this interface.
This is done to keep the Swagger annotations separated from the Controller to make it clean and readable. You can add these annotations in the Controller itself if you want.
ProductApi.java
package com.javachinna.controller;

import java.util.List;

import com.javachinna.model.Product;

import io.swagger.annotations.Api;
import io.swagger.annotations.ApiOperation;
import io.swagger.annotations.ApiResponse;
import io.swagger.annotations.ApiResponses;

@Api
public interface ProductApi {

	@ApiOperation(value = "Get list of products in the System ", response = Iterable.class)
	@ApiResponses(value = {
			@ApiResponse(code = 200, message = "Suceess"),
			@ApiResponse(code = 401, message = "Not authorized!"),
			@ApiResponse(code = 403, message = "Forbidden!"),
			@ApiResponse(code = 404, message = "Not found!") })
	public List<Product> getProductList(String consumerKey);

	@ApiOperation(value = "Get product by product ID", response = Product.class)
	public Product getProduct(Long productId);

	@ApiOperation(value = "Create product", response = String.class)
	public String createProduct(Product product);

	@ApiOperation(value = "Update product by product ID", response = String.class)
	public String updateProduct(Long productId, Product product);

	@ApiOperation(value = "Delete product by product ID", response = String.class)
	public String deleteProduct(Long productId);
}
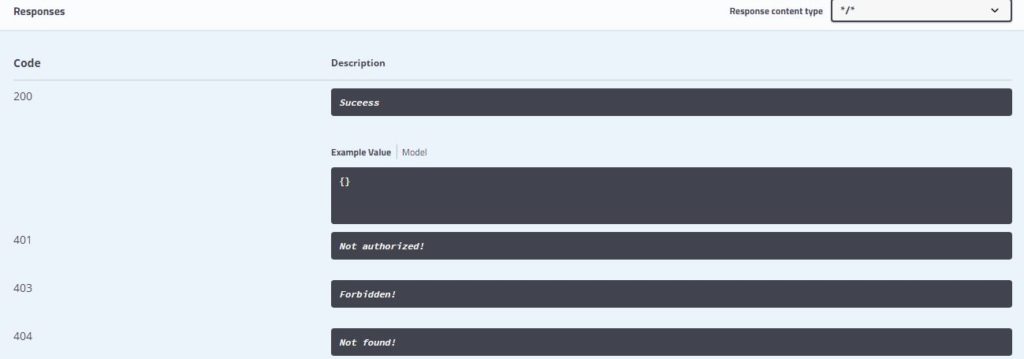
By default, Swagger will document the possible responses based on the HTTP operation. You can use @ApiResponse annotation to change that as we have done for the Get list of products API
Implement Interface
We are gonna modify ProductController class to implement the ProductApi interface
public class ProductController implements ProductApi {
Add Swagger Model Information
We are gonna modify Product class to provide model information like example value, hidden, required or not etc., as shown below
@ApiModel
@NoArgsConstructor
@AllArgsConstructor
@Data
@Entity
public class Product {
	@Id
	@GeneratedValue(strategy = GenerationType.IDENTITY)
	@ApiModelProperty(hidden = true)
	private Long id;
	@ApiModelProperty(example = "Headset", required = true)
	private String name;
	@ApiModelProperty(example = "100", required = true)
	private String price;
}
Test Application
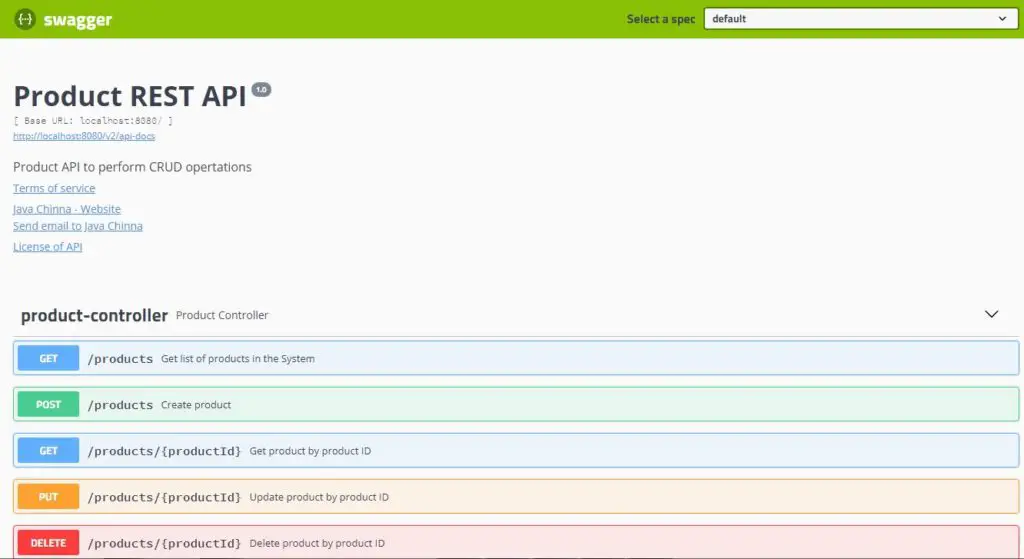
Now reload the page and expand the ProductController tab. All the endpoints will be listed with detailed information as shown below
Possible responses for Get All Products API
Product Model Example Values

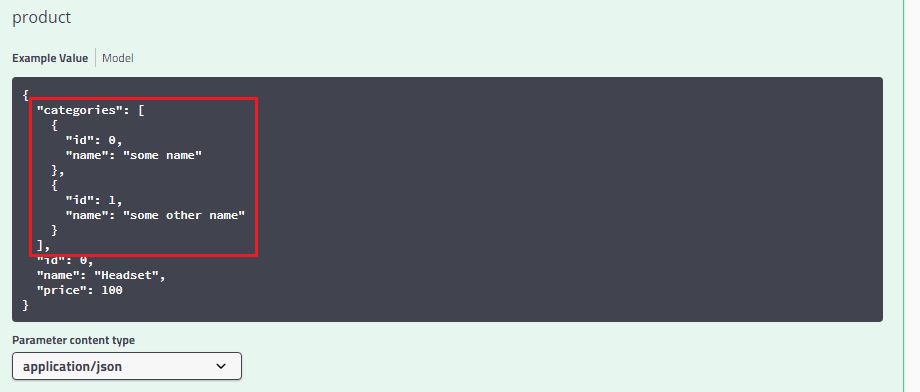
@ApiModelProperty example value for List of objects field
To set example value for List of objects field, you can use the JSON string of List<Object> as shown below
	@ApiModelProperty(example = "[{   \"id\": 0,   \"name\": \"some name\" }, {   \"id\": 1,   \"name\": \"some other name\" }]", required = true)
	private List<Category> categories;
Swagger UI Output
Source Code
As always, you can get the source code from the Github below
https://github.com/JavaChinna/spring-boot-rest-swagger
Conclusion
That’s all folks! In this article, you’ve learned how to integrate Swagger with Spring Boot RESTful services.
I hope you enjoyed this article. Thank you for reading.


wow, such amazing Tutorial. Thank you!
May I ask how you figured out to swagger annotations by implementing to separate interface?
Thank you. I don’t want to pollute the REST controller with the swagger annotations. So I thought of creating an interface for the swagger annotations and letting the REST controller extend from it.
very informative article. Thank you.