In the previous article, we have deployed our Spring Boot & Angular application on Digital Ocean Kubernetes. In this article, we are gonna integrate the Razorpay payment gateway into that application.
Disclosure: Please note that some of the links in this post are referral/affiliate links. If you click on such a link and end up making a purchase, we’ll receive a credit/commission which will help us to keep the blog running. The amount you pay for the product doesn’t increase.
Introduction
Razorpay is a platform that enables businesses to accept, process, and disburse payments with its product suite. It provides Standard Integration and Quick Integration to integrate the Payment Gateway. We are gonna integrate the Razorpay Standard Checkout to accept payments in our application since it provides more control over the customization of the Checkout compared to Quick Integration.
What You’ll Build
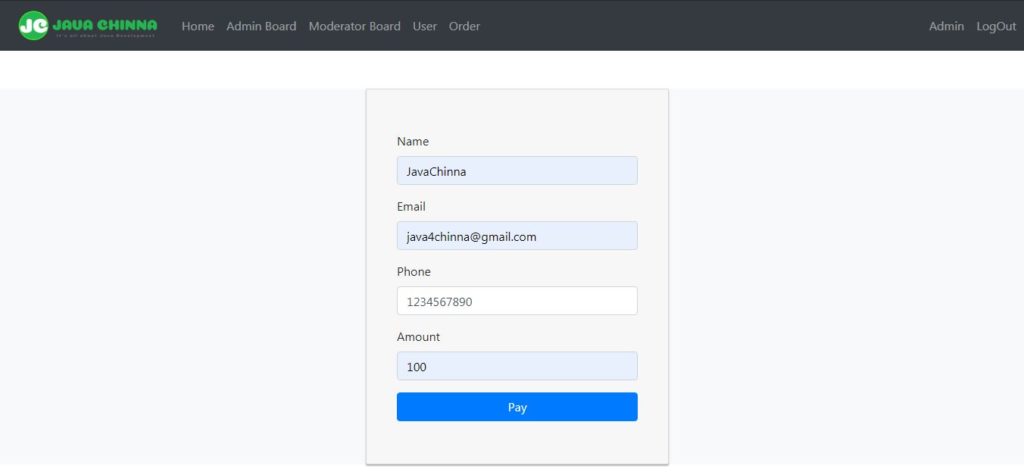
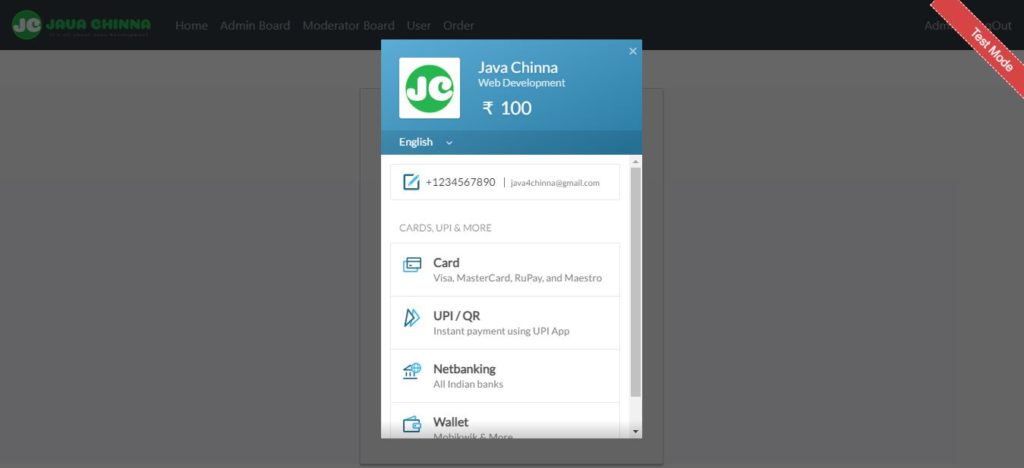
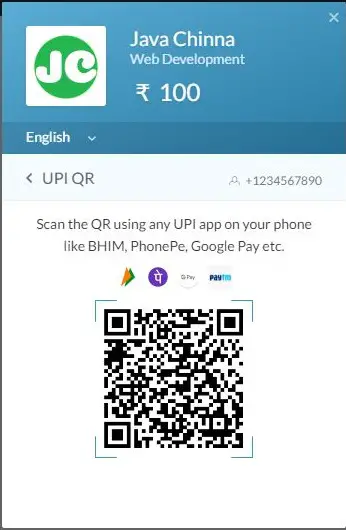
Angular Frontend
Order Page

Razorpay Standard Integration

Payment Mode: UPI QR

Spring Boot Backend
We will be implementing the following REST APIs to create/update order:
- Creating Order – Expose a POST API with mapping /order. On passing order details, it will call the Razorpay client to create a Razorpay Order. Once the Order is created, the client will return the Razorpay Order ID which will be stored in the Order table along with the User ID and the Order ID will be returned in the response.
- Validating and Updating Order – Expose a PUT API with mapping /order. On passing the payment response containing Razorpay payment id, order Id, and signature received from Razorpay, it will validate the authenticity of the details using the signature. Upon successful validation, it will update the Order with payment id, order id, and signature in the order table. So that, the order details of the user can be tracked.
What You’ll Need
Run the following checklist before you begin the integration:
- Create a Razorpay Account. I was told by the Razorpay Partner Team that If you sign up for an account using my referral link, then you will get some credits which you can use for transactions upto 3 Lakhs (INR) without charges.
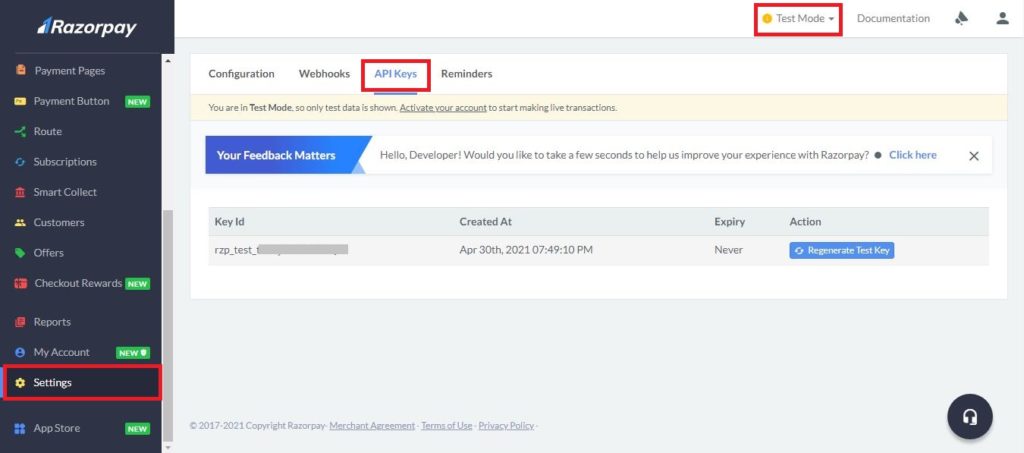
- Generate API Keys:
- Go to your Razorpay Dashboard and Select Test Mode on the top right
- To generate the keys for the Test mode, Go to Settings -> API Keys.
- For production, you need to generate keys for the Live Mode and use them in your Spring Boot
application-prod.properties

Angular Client Integration
Modify index.html
- Check if the viewport meta tag is added in your Angular
index.html. If not, add the following line.<meta name="viewport" content="width=device-width, initial-scale=1.0">- Note: If this meta tag is not present, there will be overflow issues.
- Add
<script src="https://checkout.razorpay.com/v1/checkout.js"></script>
<!DOCTYPE html>
<html lang="en">
  <head>
    <meta charset="utf-8" />
    <title>Angular11SocialLogin</title>
    <base href="/" />
    <meta name="viewport" content="width=device-width, initial-scale=1" />
    <link rel="icon" type="image/x-icon" href="favicon.ico" />
    <link
      rel="stylesheet"
      href="https://stackpath.bootstrapcdn.com/bootstrap/4.4.1/css/bootstrap.min.css"
      integrity="sha384-Vkoo8x4CGsO3+Hhxv8T/Q5PaXtkKtu6ug5TOeNV6gBiFeWPGFN9MuhOf23Q9Ifjh"
      crossorigin="anonymous"
    />
  </head>
  <body>
    <app-root></app-root>
  </body>
  <script src="https://checkout.razorpay.com/v1/checkout.js"></script>
</html>
Create Order Page
order.component.ts
This component does the following:
- Declares a variable called Razorpay as
anytype. - Declares a variable called
optionswith all the parameters required for the Razorpay checkout.- Some of the parameters are captured in the form
- Razorpay order id is being returned in the response of the REST API
- Since it is a demo application, the rest of the parameters are hardcoded. But in a live application, most of these values will be captured dynamically from the user.
- Defines a handler function to create a
payment.successevent. So that when event is occured, the payment response can be captured and processed.
- Binds the form data to
OrderService.createOrder()method that returns anObservableobject. If the order is created successfully, then,- It populates the order id from the response and form parameters into the
optionsvariable. - Creates an instance of
Razorpaywith theoptionsand callsRazorpay.open()method to initiate the payment process. - Defines a handler function for the
payment.failedevent in order to log the error details and show failure reason in the page in case of payment failure. Make sure to store the payment failure details in theOrdertable in the database. So that the customer can retry the payment.
- It populates the order id from the response and form parameters into the
- Defines a function called
onPaymentSuccessand binds thepayment.successevent with this function using the@HostListenerdecorator as we already explained in the previous article.- Whenever a
payment.successevent is triggered, this function will be invoked to process the payment response.
- This function invokes
OrderService.updateOrder()function that returns anObservableobject. On successful response, it will set thepaymentIdfrom the response. So that, a payment success message will be displayed along with thepaymentId.
- Whenever a
import { HostListener, Component } from '@angular/core';
import { OrderService } from '../_services/order.service';

declare var Razorpay: any;

@Component({
selector: 'app-order',
templateUrl: './order.component.html',
styleUrls: ['./order.component.css']
})
export class OrderComponent {

	form: any = {};
	paymentId: string;
	error: string;

	constructor(private orderService: OrderService) {

	}

	options = {
	"key": "",
	"amount": "",
	"name": "Java Chinna",
	"description": "Web Development",
	"image": "https://www.javachinna.com/wp-content/uploads/2020/02/android-chrome-512x512-1.png",
	"order_id":"",
	"handler": function (response){
		var event = new CustomEvent("payment.success",
			{
				detail: response,
				bubbles: true,
				cancelable: true
			}
		);
		window.dispatchEvent(event);
	}
	,
	"prefill": {
	"name": "",
	"email": "",
	"contact": ""
	},
	"notes": {
	"address": ""
	},
	"theme": {
	"color": "#3399cc"
	}
	};

	onSubmit(): void {
		this.paymentId = '';
		this.error = '';
		this.orderService.createOrder(this.form).subscribe(
		data => {
			this.options.key = data.secretKey;
			this.options.order_id = data.razorpayOrderId;
			this.options.amount = data.applicationFee; //paise
			this.options.prefill.name = this.form.name;
			this.options.prefill.email = this.form.email;
			this.options.prefill.contact = this.form.phone;
			var rzp1 = new Razorpay(this.options);
			rzp1.open();

			rzp1.on('payment.failed', function (response){
				// Todo - store this information in the server
				console.log(response.error.code);
				console.log(response.error.description);
				console.log(response.error.source);
				console.log(response.error.step);
				console.log(response.error.reason);
				console.log(response.error.metadata.order_id);
				console.log(response.error.metadata.payment_id);
				this.error = response.error.reason;
			}
			);
		}
		,
		err => {
			this.error = err.error.message;
		}
		);
	}

	@HostListener('window:payment.success', ['$event'])
	onPaymentSuccess(event): void {
		this.orderService.updateOrder(event.detail).subscribe(
		data => {
			this.paymentId = data.message;
		}
		,
		err => {
			this.error = err.error.message;
		}
		);
	}
}
order.component.html
This html file has a form to capture some nessasary details like customer name, email, phone and amount. It will also show the payment status once the payment is made.
<div class="col-md-12">
	<div class="card card-container">
		<form name="form" (ngSubmit)="f.form.valid && onSubmit()" #f="ngForm" novalidate>
			<div class="form-group">
				<div class="alert alert-danger" role="alert" *ngIf="error">Payment failed: {{ error }}</div>
				<div class="alert alert-success" role="alert" *ngIf="paymentId">Payment Success. Payment ID: {{ paymentId }}</div>
			</div>
			<div class="form-group">
				<label for="name">Name</label> <input type="text" class="form-control" name="name" [(ngModel)]="form.name" required minlength="3" maxlength="20" #name="ngModel" />
				<div class="alert-danger" *ngIf="f.submitted && name.invalid">
					<div *ngIf="name.errors.required">Name is required</div>
					<div *ngIf="name.errors.minlength">Name must be at least 3 characters</div>
					<div *ngIf="name.errors.maxlength">Name must be at most 20 characters</div>
				</div>
			</div>
			<div class="form-group">
				<label for="email">Email</label> <input type="text" class="form-control" name="email" [(ngModel)]="form.email" required #email="ngModel" />
				<div class="alert alert-danger" role="alert" *ngIf="f.submitted && email.invalid">Email is required!</div>
			</div>
			<div class="form-group">
				<label for="phone">Phone</label> <input type="number" class="form-control" name="phone" [(ngModel)]="form.phone" required minlength="10" maxlength="10"
					#phone="ngModel" />
				<div class="alert alert-danger" role="alert" *ngIf="f.submitted && phone.invalid">
					<div *ngIf="phone.errors.required">Phone is required</div>
					<div *ngIf="phone.errors.minlength || phone.errors.maxlength">Phone must be 10 digits</div>
				</div>
			</div>
			<div class="form-group">
				<label for="amount">Amount</label> <input type="number" class="form-control" name="amount" [(ngModel)]="form.amount" required #amount="ngModel" />
				<div class="alert alert-danger" role="alert" *ngIf="f.submitted && amount.invalid">
					<div *ngIf="amount.errors.required">Amount is required</div>
				</div>
			</div>
			<div class="form-group">
				<button class="btn btn-primary btn-block">Pay</button>
			</div>
		</form>
	</div>
</div>
order.component.css
label {
  display: block;
  margin-top: 10px;
}

.card-container.card {
  max-width: 400px !important;
  padding: 40px 40px;
}

.card {
  background-color: #f7f7f7;
  padding: 20px 25px 30px;
  margin: 0 auto 25px;
  margin-top: 50px;
  -moz-border-radius: 2px;
  -webkit-border-radius: 2px;
  border-radius: 2px;
  -moz-box-shadow: 0px 2px 2px rgba(0, 0, 0, 0.3);
  -webkit-box-shadow: 0px 2px 2px rgba(0, 0, 0, 0.3);
  box-shadow: 0px 2px 2px rgba(0, 0, 0, 0.3);
}
Create Order Service
order.service.ts
This is a service class used to call the Order REST API for creating and updating the order.
import { Injectable } from '@angular/core';
import { HttpClient, HttpHeaders } from '@angular/common/http';
import { Observable } from 'rxjs';
import { AppConstants } from '../common/app.constants';

const httpOptions = {
headers: new HttpHeaders({ 'Content-Type': 'application/json' })
};
declare var Razorpay: any;

@Injectable({
providedIn: 'root'
})
export class OrderService {

	constructor(private http: HttpClient) {

	}

	createOrder(order): Observable<any> {
		return this.http.post(AppConstants.API_URL + 'order', {
		customerName: order.name,
		email: order.email,
		phoneNumber: order.phone,
		amount: order.amount
		}, httpOptions);
	}

	updateOrder(order): Observable<any> {
		return this.http.put(AppConstants.API_URL + 'order', {
		razorpayOrderId: order.razorpay_order_id,
		razorpayPaymentId: order.razorpay_payment_id,
		razorpaySignature: order.razorpay_signature
		}, httpOptions);
	}
}
Define Module
app.module.ts
Import and add OrderComponent in the module declarations
import { BrowserModule } from '@angular/platform-browser';
import { NgModule } from '@angular/core';

import { AppRoutingModule } from './app-routing.module';
import { FormsModule } from '@angular/forms';
import { HttpClientModule } from '@angular/common/http';

import { AppComponent } from './app.component';
import { LoginComponent } from './login/login.component';
import { RegisterComponent } from './register/register.component';
import { HomeComponent } from './home/home.component';
import { ProfileComponent } from './profile/profile.component';
import { BoardAdminComponent } from './board-admin/board-admin.component';
import { BoardModeratorComponent } from './board-moderator/board-moderator.component';
import { BoardUserComponent } from './board-user/board-user.component';
import { TotpComponent } from './totp/totp.component';
import { OrderComponent } from './order/order.component';

import { authInterceptorProviders } from './_helpers/auth.interceptor';

@NgModule({
  declarations: [
    AppComponent,
    LoginComponent,
    RegisterComponent,
    HomeComponent,
    ProfileComponent,
    BoardAdminComponent,
    BoardModeratorComponent,
    BoardUserComponent,
    TotpComponent,
    OrderComponent
  ],
  imports: [
    BrowserModule,
    AppRoutingModule,
    FormsModule,
    HttpClientModule
  ],
  providers: [authInterceptorProviders],
  bootstrap: [AppComponent]
})
export class AppModule { }
Define Module Routing
app-routing.module.ts
Import and add OrderComponent in the route declarations
import { NgModule } from '@angular/core';
import { Routes, RouterModule } from '@angular/router';

import { RegisterComponent } from './register/register.component';
import { LoginComponent } from './login/login.component';
import { HomeComponent } from './home/home.component';
import { ProfileComponent } from './profile/profile.component';
import { BoardUserComponent } from './board-user/board-user.component';
import { BoardModeratorComponent } from './board-moderator/board-moderator.component';
import { BoardAdminComponent } from './board-admin/board-admin.component';
import { TotpComponent } from './totp/totp.component';
import { OrderComponent } from './order/order.component';

const routes: Routes = [
  { path: 'home', component: HomeComponent },
  { path: 'login', component: LoginComponent },
  { path: 'register', component: RegisterComponent },
  { path: 'profile', component: ProfileComponent },
  { path: 'user', component: BoardUserComponent },
  { path: 'mod', component: BoardModeratorComponent },
  { path: 'admin', component: BoardAdminComponent },
  { path: 'totp', component: TotpComponent },
  { path: 'order', component: OrderComponent },
  { path: '', redirectTo: 'home', pathMatch: 'full' }
];

@NgModule({
  imports: [RouterModule.forRoot(routes, { relativeLinkResolution: 'legacy', useHash: true })],
  exports: [RouterModule]
})
export class AppRoutingModule { }
Add Order Menu
Let’s add an order menu in the navbar and display it only if the user is logged in.
app.component.html
		<ul class="navbar-nav mr-auto" routerLinkActive="active">
			<li class="nav-item"><a href="/home" class="nav-link" routerLink="home">Home </a></li>
			<li class="nav-item" *ngIf="showAdminBoard"><a href="/admin" class="nav-link" routerLink="admin">Admin Board</a></li>
			<li class="nav-item" *ngIf="showModeratorBoard"><a href="/mod" class="nav-link" routerLink="mod">Moderator Board</a></li>
			<li class="nav-item"><a href="/user" class="nav-link" *ngIf="isLoggedIn" routerLink="user">User</a></li>
			<li class="nav-item"><a href="/order" class="nav-link" *ngIf="isLoggedIn" routerLink="order">Order</a></li>
		</ul>
Spring Boot Backend integration
Add Razorpay Dependency
pom.xml
Get the latest version from the maven repository.
<dependency>
			<groupId>com.razorpay</groupId>
			<artifactId>razorpay-java</artifactId>
			<version>1.3.9</version>
		</dependency>
Configure Razorpay API Keys
application.properties
razorpay.key=rzp_test_tF42jI563EUWQE
razorpay.secret=eGakMHimSEH7Lzb1f002golU
RazorPayClientConfig.java
Configuration class for the Razorpay API Keys
package com.javachinna.config;

import org.springframework.boot.context.properties.ConfigurationProperties;
import org.springframework.stereotype.Component;

import lombok.Data;

@Data
@Component
@ConfigurationProperties(prefix = "razorpay")
public class RazorPayClientConfig {
	private String key;
	private String secret;
}
Create Model Classes
OrderRequest.java
package com.javachinna.dto.payment;

import lombok.Data;

@Data
public class OrderRequest {
	private String customerName;
	private String email;
	private String phoneNumber;
	private String amount;
}
OrderResponse.java
package com.javachinna.dto.payment;

import lombok.Data;

@Data
public class OrderResponse {
	private String applicationFee;
	private String razorpayOrderId;
	private String secretKey;
}
PaymentResponse.java
package com.javachinna.dto.payment;

import lombok.Data;

@Data
public class PaymentResponse {
	private String razorpayOrderId;
	private String razorpayPaymentId;
	private String razorpaySignature;
}
Create Utilities Class
Signature.java
This class is used to generate a signature with a given data and secret.
package com.javachinna.util;

import java.security.SignatureException;

import javax.crypto.Mac;
import javax.crypto.spec.SecretKeySpec;
import javax.xml.bind.DatatypeConverter;

/**
 * This class defines common routines for generating authentication signatures
 * for Razorpay Webhook requests.
 */
public class Signature {
	private static final String HMAC_SHA256_ALGORITHM = "HmacSHA256";
	/**
	 * Computes RFC 2104-compliant HMAC signature. * @param data The data to be
	 * signed.
	 *
	 * @param key
	 *            The signing key.
	 * @return The Base64-encoded RFC 2104-compliant HMAC signature.
	 * @throws java.security.SignatureException
	 *             when signature generation fails
	 */
	public static String calculateRFC2104HMAC(String data, String secret) throws java.security.SignatureException {
		String result;
		try {

			// get an hmac_sha256 key from the raw secret bytes
			SecretKeySpec signingKey = new SecretKeySpec(secret.getBytes(), HMAC_SHA256_ALGORITHM);

			// get an hmac_sha256 Mac instance and initialize with the signing
			// key
			Mac mac = Mac.getInstance(HMAC_SHA256_ALGORITHM);
			mac.init(signingKey);

			// compute the hmac on input data bytes
			byte[] rawHmac = mac.doFinal(data.getBytes());

			// base64-encode the hmac
			result = DatatypeConverter.printHexBinary(rawHmac).toLowerCase();

		} catch (Exception e) {
			throw new SignatureException("Failed to generate HMAC : " + e.getMessage());
		}
		return result;
	}
}
Create JPA Entity
Order.java
This order entity maps to the user_order table in the database
package com.javachinna.model;

import java.io.Serializable;

import javax.persistence.Entity;
import javax.persistence.GeneratedValue;
import javax.persistence.GenerationType;
import javax.persistence.Id;
import javax.persistence.Table;

import lombok.Getter;
import lombok.NoArgsConstructor;
import lombok.Setter;

/**
 * The persistent class for the user_order database table.
 *
 */
@Entity
@Table(name = "user_order")
@NoArgsConstructor
@Getter
@Setter
public class Order implements Serializable {

	/**
	 *
	 */
	private static final long serialVersionUID = 65981149772133526L;

	@Id
	@GeneratedValue(strategy = GenerationType.IDENTITY)
	private Long id;

	private Long userId;

	private String razorpayPaymentId;

	private String razorpayOrderId;

	private String razorpaySignature;

}
Create Spring Data Repository
OrderRepository.java
This repository is responsible for querying the user_order table.
package com.javachinna.repo;

import org.springframework.data.jpa.repository.JpaRepository;
import org.springframework.stereotype.Repository;

import com.javachinna.model.Order;

@Repository
public interface OrderRepository extends JpaRepository<Order, Long> {

	Order findByRazorpayOrderId(String orderId);
}
Create Service Class
OrderService.java
This service class is responsible for the following operations:
- Persists the Order
- Generates a signature with Razorpay order id retrieved from order table, Razorpay payment id, and Razorpay secret
- Compares the generated signature with Razorpay signature.
- If matches, updates the Order with the payment id and Signature in the order table
- Else returns the “Payment validation failed” error message.
package com.javachinna.service;

import org.springframework.beans.factory.annotation.Autowired;
import org.springframework.stereotype.Service;
import org.springframework.transaction.annotation.Transactional;

import com.javachinna.model.Order;
import com.javachinna.repo.OrderRepository;
import com.javachinna.util.Signature;

import lombok.extern.slf4j.Slf4j;

/**
 *
 * @author Chinna
 *
 */
@Slf4j
@Service
public class OrderService {

	@Autowired
	private OrderRepository orderRepository;

	@Transactional
	public Order saveOrder(final String razorpayOrderId, final Long userId) {
		Order order = new Order();
		order.setRazorpayOrderId(razorpayOrderId);
		order.setUserId(userId);
		return orderRepository.save(order);
	}

	@Transactional
	public String validateAndUpdateOrder(final String razorpayOrderId, final String razorpayPaymentId, final String razorpaySignature, final String secret) {
		String errorMsg = null;
		try {
			Order order = orderRepository.findByRazorpayOrderId(razorpayOrderId);
			// Verify if the razorpay signature matches the generated one to
			// confirm the authenticity of the details returned
			String generatedSignature = Signature.calculateRFC2104HMAC(order.getRazorpayOrderId() + "|" + razorpayPaymentId, secret);
			if (generatedSignature.equals(razorpaySignature)) {
				order.setRazorpayOrderId(razorpayOrderId);
				order.setRazorpayPaymentId(razorpayPaymentId);
				order.setRazorpaySignature(razorpaySignature);
				orderRepository.save(order);
			} else {
				errorMsg = "Payment validation failed: Signature doesn't match";
			}
		} catch (Exception e) {
			log.error("Payment validation failed", e);
			errorMsg = e.getMessage();
		}
		return errorMsg;
	}
}
Create REST Controller
OrderController
Exposes REST API for creating an order with Razorpay as well as in the database and updating the order.
package com.javachinna.controller;

import java.math.BigDecimal;
import java.math.RoundingMode;

import org.json.JSONObject;
import org.springframework.beans.factory.annotation.Autowired;
import org.springframework.http.HttpStatus;
import org.springframework.http.ResponseEntity;
import org.springframework.web.bind.annotation.PostMapping;
import org.springframework.web.bind.annotation.PutMapping;
import org.springframework.web.bind.annotation.RequestBody;
import org.springframework.web.bind.annotation.RequestMapping;
import org.springframework.web.bind.annotation.RestController;

import com.javachinna.config.CurrentUser;
import com.javachinna.config.RazorPayClientConfig;
import com.javachinna.dto.ApiResponse;
import com.javachinna.dto.LocalUser;
import com.javachinna.dto.payment.OrderRequest;
import com.javachinna.dto.payment.OrderResponse;
import com.javachinna.dto.payment.PaymentResponse;
import com.javachinna.service.OrderService;
import com.razorpay.Order;
import com.razorpay.RazorpayClient;
import com.razorpay.RazorpayException;

import lombok.extern.slf4j.Slf4j;

/**
 *
 * @author Chinna
 */
@Slf4j
@RestController
@RequestMapping("/api")
public class OrderController {

	private RazorpayClient client;

	private RazorPayClientConfig razorPayClientConfig;

	@Autowired
	private OrderService orderService;

	@Autowired
	public OrderController(RazorPayClientConfig razorpayClientConfig) throws RazorpayException {
		this.razorPayClientConfig = razorpayClientConfig;
		this.client = new RazorpayClient(razorpayClientConfig.getKey(), razorpayClientConfig.getSecret());
	}

	@PostMapping("/order")
	public ResponseEntity<?> createOrder(@RequestBody OrderRequest orderRequest, @CurrentUser LocalUser user) {
		OrderResponse razorPay = null;
		try {
			// The transaction amount is expressed in the currency subunit, such
			// as paise (in case of INR)
			String amountInPaise = convertRupeeToPaise(orderRequest.getAmount());
			// Create an order in RazorPay and get the order id
			Order order = createRazorPayOrder(amountInPaise);
			razorPay = getOrderResponse((String) order.get("id"), amountInPaise);
			// Save order in the database
			orderService.saveOrder(razorPay.getRazorpayOrderId(), user.getUser().getId());
		} catch (RazorpayException e) {
			log.error("Exception while create payment order", e);
			return new ResponseEntity<>(new ApiResponse(false, "Error while create payment order: " + e.getMessage()), HttpStatus.EXPECTATION_FAILED);
		}
		return ResponseEntity.ok(razorPay);
	}

	@PutMapping("/order")
	public ResponseEntity<?> updateOrder(@RequestBody PaymentResponse paymentResponse) {
		String errorMsg = orderService.validateAndUpdateOrder(paymentResponse.getRazorpayOrderId(), paymentResponse.getRazorpayPaymentId(), paymentResponse.getRazorpaySignature(),
				razorPayClientConfig.getSecret());
		if (errorMsg != null) {
			return new ResponseEntity<>(new ApiResponse(false, errorMsg), HttpStatus.BAD_REQUEST);
		}
		return ResponseEntity.ok(new ApiResponse(true, paymentResponse.getRazorpayPaymentId()));
	}

	private OrderResponse getOrderResponse(String orderId, String amountInPaise) {
		OrderResponse razorPay = new OrderResponse();
		razorPay.setApplicationFee(amountInPaise);
		razorPay.setRazorpayOrderId(orderId);
		razorPay.setSecretKey(razorPayClientConfig.getKey());
		return razorPay;
	}

	private Order createRazorPayOrder(String amount) throws RazorpayException {
		JSONObject options = new JSONObject();
		options.put("amount", amount);
		options.put("currency", "INR");
		options.put("receipt", "txn_123456");
		return client.Orders.create(options);
	}

	private String convertRupeeToPaise(String paise) {
		BigDecimal b = new BigDecimal(paise);
		BigDecimal value = b.multiply(new BigDecimal("100"));
		return value.setScale(0, RoundingMode.UP).toString();
	}
}
Run Spring Boot App with Maven
You can run the application using mvn clean spring-boot:run and the REST API services can be accessed via http://localhost:8080
Run the Angular App
You can run this App with the below command and hit the URL http://localhost:8081/ in browser
ng serve --port 8081
References
https://razorpay.com/docs/payment-gateway/web-integration/standard/
Source Code
https://github.com/JavaChinna/angular-spring-boot-razorpay-integration
Conclusion
That’s all folks. In this article, we have integrated Razorpay payment gateway with our Spring Boot Angular application.
Thank you for reading.


Please also provide local user as well as api response class
This integration was done on an existing application. So I have included only the newly added or modified classes required for this integration in this article. You can find the complete code in Github using the link given in the Source Code section at the end of the article.
options.put(“receipt”, “txn_123456”);
Could you help me with this. I believe its hardcoded. What should be its value in prod
As per the Razorpay API documenation,
So you can generate a unique receipt number per order and use here. It is for your internal reference only.